Outlook 2013
Before you begin, please run Windows Update to be sure you are running the latest version of Outlook.
Subscribe to your GradesFirst Calendar
Step 1: Get Your GradesFirst calendar feed URL
- In GradesFirst, navigate to the Calendar tab.
- Click the Subscriptions tab.
- Click on Setup Calendar Integration.
- On the External Calendaring Setup tab, you will see a URL displayed, beginning with "webdav://".
Select the text of this URL and copy it to your clipboard (Control + C).
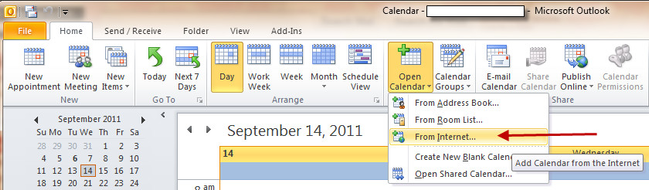
Step 2: Subscribe to your GradesFirst calendar in Outlook
1. In Outlook, navigate to the Home tab and select Calendar.
2. Click the Open Calendar button.
3. Select the From Internet option.
4. In the Account Settings dialog, select the Internet Calendars tab.
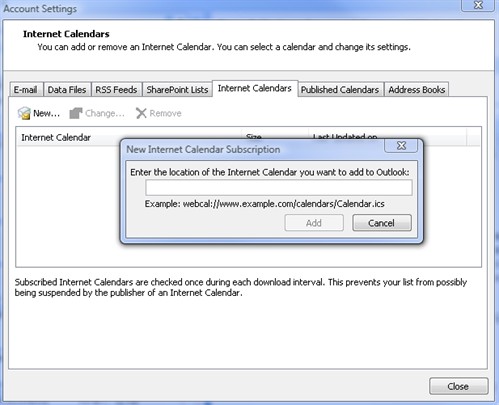
5. Click on the New... button.
6. In the New Internet Calendar Subscription dialog, paste the URL you copied in Step 1.
7. Click the Add button to add the calendar subscription.
8. Click the Close button in the Account Settings dialog.
You should now see a new calendar in Outlook which displays your GradesFirst appointments. It may take a few minutes for the appointments to show up.
Publish your Outlook calendar events to GradesFirst
Step 1: Get your GradesFirst publishing URL
- In GradesFirst, navigate to the Calendar tab.
- Click the Subscriptions tab.
- Click on Setup Free/Busy Integration.
- On the Windows Outlook Integration tab, click on Outlook 2010.
- You will see a URL displayed, beginning with "https://". Select the text of this URL and copy it to your clipboard (Control + C).
Step 2: Publish your Outlook calendar to GradesFirst
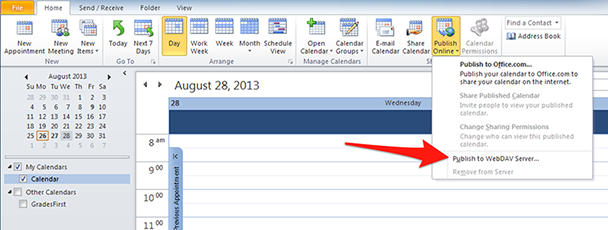
1. In Outlook, navigate to the Home tab and select Calendar.
2. Click the Publish Online button.
3. Select Publish to WebDAV Server.
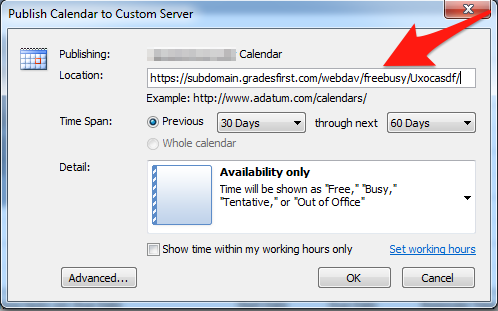
4. Enter the URL you copied from GradesFirst in the Location box. Click OK.
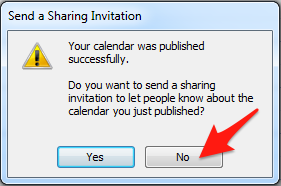
5. You should then see a success message. Outlook asks if you would like to send a sharing invitation to let others know about the calendar you've published. Click No.
6. Add a few test appointments to your Outlook calendar.
7. After a few minutes, your appointments should appear on your GradesFirst calendar as Busy blocks.
Troubleshooting
If your calendar does not appear in GradesFirst after a few minutes, please try the following modifications to your settings to see if one of them will work for your Outlook installation.
After each settings modification, please perform these steps:
- Add a few test appointments to your Outlook calendar.
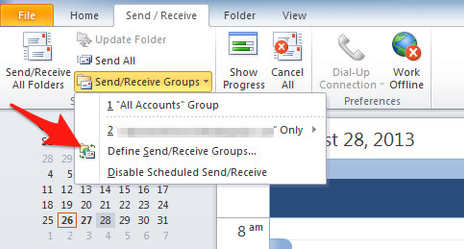
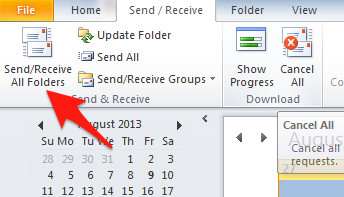
- Click the "Send/Receive All Folders" button.
- Click on the Show Progress button to see that information is being sent and received successfully.
- Wait 5 to 10 minutes.
- After a few minutes, your appointments should appear on your GradesFirst calendar as Busy blocks.
- If this does not work, please try shutting down the Outlook program, re-opening Outlook, and then repeating the steps above.
Send/Receive Group Settings
1. Shut down the Outlook program on your computer.
2. Now, re-open the Outlook program. Add a few test appointments, select the Send / Receive tab, and click Send/Receive All Folders. Click on the Show Progress button to see that information is being sent and received successfully.

3. Check Send/Receive Group settings.
- In Outlook, select the Send / Receive tab, then Send/Receive Groups, then Define Send/Receive Groups.
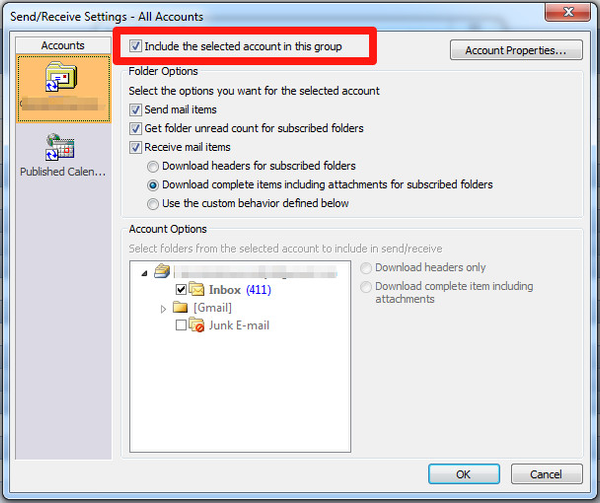
- In the Send/Receive Groups dialog, notice that you can adjust your automatic send/receive frequency. Now, click Edit.

- Make sure that the "Include the selected account in this group" checkbox is checked.
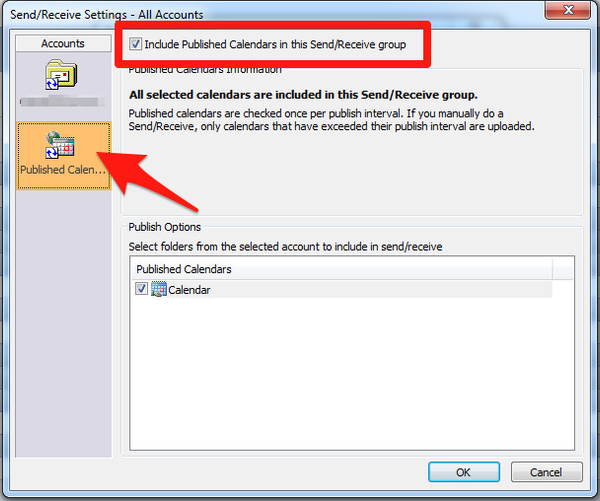
- In the Accounts list on the left, click "Published Calendars". Make sure the "Include Published Calendars in this Send/Receive group" checkbox is checked. Then, click OK.
- Try adding a few test appointments to your Outlook calendar. Then, click the "Send/Receive All Folders" button. Click on the Show Progress button to see that information is being sent and received successfully. Wait a few minutes and see if your Outlook appointments appear in GradesFirst as "Busy" times on your calendar.
Frequency and Duration Settings
Summary: Try changing your frequency and duration settings to publish 3 months every 1 minute or 2 months every 5 minutes.
Instructions:
- In Outlook, navigate to the File tab and select Options.
- Click the File tab.
- Click Options.
- Click the Calendar tab, and then Free/busy Options.
- Select Other Free/Busy
- Click to select the Publish at My Location check box under the Internet Free/busy section.
- Set the settings to publish 3 months every 1 minute. Then click OK.
- Add a few test appointments to your Outlook calendar.
- Click the "Send/Receive All Folders" button.
- Click on the Show Progress button to see that information is being sent and received successfully.
- After a few minutes, your appointments should appear on your GradesFirst calendar as Busy blocks.
- If this does not work, please try shutting down the Outlook program, re-opening the program, and repeating the steps above with the settings to publish 2 months every 5 minutes.
URL Settings
Option 1:
Summary: If you're using a URL with "webdav.campus.eab.com", try replacing that with "webdav.gradesfirst.com".
Instructions:
- In Outlook, navigate to the File tab and select Options.
- Click the File tab.
- Click Options.
- Click the Calendar tab, and then Free/busy Options.
- Select Other Free/Busy
- Click to select the Publish at My Location check box under the Internet Free/busy section.
- In the URL field, change "webdav.campus.eab.com" to "webdav.gradesfirst.com". Then click OK.
- Add a few test appointments to your Outlook calendar.
- Click the "Send/Receive All Folders" button.
- Click on the Show Progress button to see that information is being sent and received successfully.
- After a few minutes, your appointments should appear on your GradesFirst calendar as Busy blocks.
- If this does not work, please try shutting down the Outlook program, re-opening the program, and repeating the steps above.
Option 2:
Summary: Try using "http" rather than "https".
Instructions:
- In Outlook, navigate to the File tab and select Options.
- Click the File tab.
- Click Options.
- Click the Calendar tab, and then Free/busy Options.
- Select Other Free/Busy
- Click to select the Publish at My Location check box under the Internet Free/busy section.
- In the URL field, change "https" to "http". Then click OK.
- Add a few test appointments to your Outlook calendar.
- Click the "Send/Receive All Folders" button.
- Click on the Show Progress button to see that information is being sent and received successfully.
- After a few minutes, your appointments should appear on your GradesFirst calendar as Busy blocks.
- If this does not work, please try shutting down the Outlook program, re-opening the program, and repeating the steps above.
Option 3:
Summary: Try using the standard Outlook URL rather than the Outlook for Office 365 URL
Instructions:
- In GradesFirst, navigate to the Calendar tab.
- Click the Subscriptions tab.
- Click on Setup Free/Busy Integration.
- On the Windows Outlook Integration tab, click on Outlook 2013.
- You will see a URL displayed, beginning with "https://". Select the text of this URL and copy it to your clipboard (Control + C).
- In Outlook, navigate to the File tab and select Options.
- Click the File tab.
- Click Options.
- Click the Calendar tab, and then Free/busy Options.
- Select Other Free/Busy
- Click to select the Publish at My Location check box under the Internet Free/busy section, and then paste your GradesFirst URL in the field.
- Add a few test appointments to your Outlook calendar.
- Click the "Send/Receive All Folders" button.
- Click on the Show Progress button to see that information is being sent and received successfully.
- After a few minutes, your appointments should appear on your GradesFirst calendar as Busy blocks.
- If this does not work, please try shutting down the Outlook program, re-opening the program, and repeating the steps above.
- If this still does not work, return to step 11 and replace "https" with "http".
Permissions
Summary: Try enabling the "Folder Visible" and / or "Folder Owner" permission
Instructions:
- In Outlook, navigate to the File tab and select Options.
- Click the File tab.
- Click Options.
- Click the Calendar tab, and then Free/busy Options.
- Be sure the "Folder Visible" permission checkbox is checked.
- Click Ok.
- Add a few test appointments to your Outlook calendar.
- Click the "Send/Receive All Folders" button.
- Click on the Show Progress button to see that information is being sent and received successfully.
- After a few minutes, your appointments should appear on your GradesFirst calendar as Busy blocks.
- If this does not work, please try shutting down the Outlook program, re-opening the program, and repeating the steps above.
- If this does not work, please try checking the "Folder Owner" permission checkbox.