Setting up Advising Availabilities and Appointment Constraints
From the Advising Home page, click on the My Availability tab.
Appointment Constraints
To define parameters that control your availability with appointments, first click the Edit Appointment Constraints option.

When clicked, these options are available for you to define:
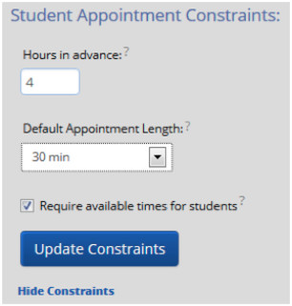
1. Hours in Advance refers to how many hours, from the current time, a student must wait before they can schedule an appointment. For instance in the example above, if the current time is 10:00am, the earliest a student would be able to schedule an appointment with you would be 2:00pm. This setting only applies to students making appointments.
2. Default Appointment Length is the default length of this specific advisor’s appointment. This can be overridden by users with the appointment create permission, except by students, during appointment creation.
3. Require available times for students means that advisors must have defined Times Available (see section below) before a student can create an appointment with them. If this box is not checked, students are able to schedule with that advisor at any time and day. This box is checked by default. GradesFirst highly recommends that advisors use this default during setup.
Click the Update Constraints button to save your changes. Then, to hide the Student Appointment Constraints settings box you can simply click on the Hide Constraints link.
Availabilities
The next step is to define the days and times you will be available to meet with students.Its important to note that locations and services are created by administrators. If you have questions about any locations or services set, please contact your GradesFirst Administrator.
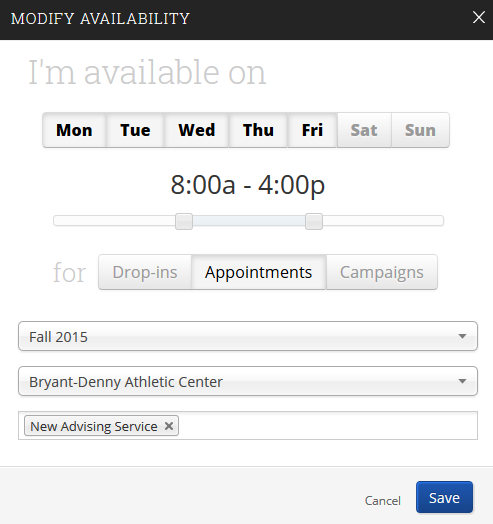
Add Time-
Step 1: Click the Add Time button
Step 2: Select the days and times when you are available to meet with students.
Step 3: Select whether you will meet with students via appointments or drop-ins during that time.
Step 4: Choose the location where you will be available.
Step 5: Lastly, select which student services you can provide to students during this availability. Note: Leaving this student services field empty means you will appear to be available for all advising student services.
Step 6: Click the Save button.
Repeat this process until all of your availabilities have been defined.
Note: You can have as many availabilities as needed.
There are two other options when adding Times Available.
Copy Time - to copy a time, select the time you would like to copy and then click the Copy Time button.
The availabilities will be copied and a dialog will open allowing you to make edits or to save your newly created availability.
Delete Time- to delete your time, simply select the time and click the Delete Time button.
Note: Inactive availabilities are highlighted in red in the Times Available grid.