| Page Tree | ||
|---|---|---|
|
| Table of Contents |
|---|
Note
Notes are a great way to attach “Commentary” to your students. They can also be used as kind of a task tracking utility as well. Check the box next to a student’s name and click the Note button.
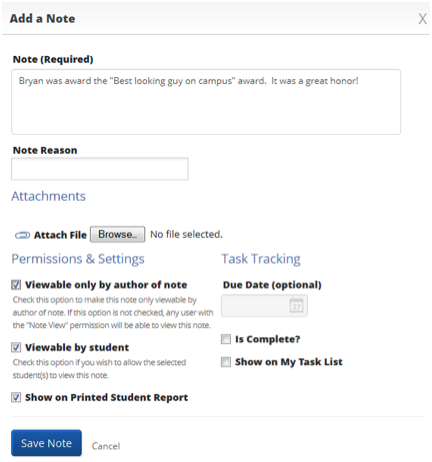
The only required field is the actual Note itself. Enter a Note, and optionally a Note Reason (see your GFA for more details), you can attach a file, select the proper permissions and Save. If you wish to use to Task Tracking, you can put the date the task is due, mark show on my task list and save. You can then go to the Reports tab and run the Notes report to view your Task list.
Mass Print
This is a great little feature that will let you print, en mass, your Student Development report (see your GFA for more details) and/or their Calendars. When printing their calendars, you can select between printing a Month, Week Calendar, or Week list report. Check the box besides the appropriate students and press the Mass Print button.
Viewing a Student’s Profile
We are going to deviate a little bit from the “Advisor’s” Home page to show you how to view a specific student’s home profile page. Anywhere you see a student’s name in the color blue; you can click that name and be taken directly to their Home profile page. This is where you can view ALL of that student’s information. See the screenshot below for an example of what a student’s home profile page will look like.
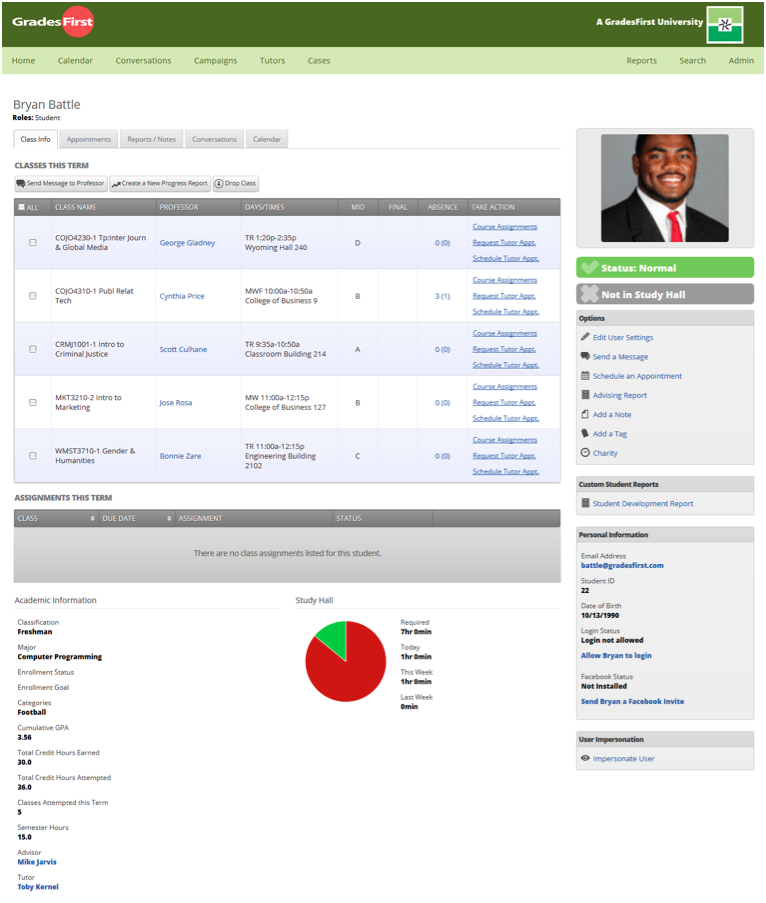
The student profile page will have many of the same options (e.g. Schedule an Appointment, Add a Tag, etc…) you will find on the advisor’s Home page, so we will not spend any time covering those options. Rather, we will focus our time on the options specific to the student.
Classes This Term
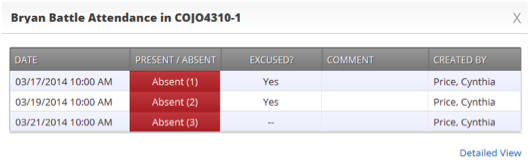
This grid displays the students schedule for the current term. Alongside each course name will be a Professors name (in blue), which means you can click on their name and be taken to their profile page. You will also see the Days/Times each class meets, along with any mid-term or final grades assigned. You will also notice the Absence column and its value, also in blue. Clicking on the number of absences for a course will give you the specifics about each absence (see screenshot below).
The last column of the Classes This Term grid will allow the advisor several actions per course. What you see here wil be entirely based on your user privileges assigned by your GFA. These actions are as follows.
Course Assignments
Depending on your advisor permissions, you may be able to click on the Course Assignments link to view all of the assignments that have been created (most likely by the professor) for that course. Again, depending on your permissions, you may even be able to create new assignments.
Request Tutor Appt
If you see this option this means you are able to request for a tutor to schedule a tutor appointment with your student for that specific course. For example, when I click on the Request Tutor Appt. link the below popup appears.
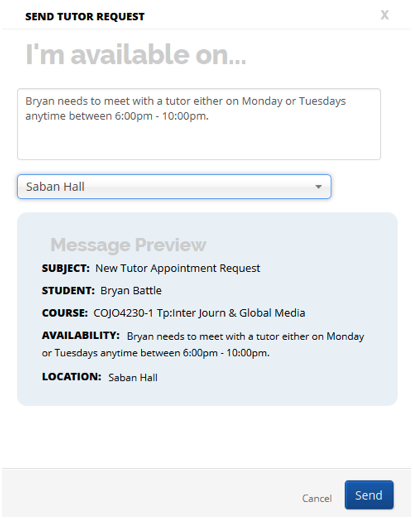
The first field in this popup is a comment box where I should enter when the student is able to meet with a tutor. You should be as specific as possible when commenting on when the student would like to meet with the tutor. Next, you will select a Location for this appointment. When all the information has been entered, you can preview the request before sending. Click Save when done and an email will be sent to the Tutor Coordinator for that location.
Schedule Tutor Appt
Rather than simply request a tutor appointment, if you have this permission, you can bypass requesting and actually create a tutor appointment. When you click this link, the Schedule an Appointment page (see page 6) will appear and you can create a tutor appointment for your student.
Let’s now cover the buttons that appear on top of the Classes This Term grid. These buttons are:
Send Message to Professor
You can check the box besides one or more professors and click the Send Message to Professor button to quickly communicate with the student’s professors.
Create a New Progress Report
A progress report, which will be covered in greater detail later in this guide, is a way a professor can indicate how a specific student is doing in their class. “This student is at-risk to fail my course” or “Bryan is doing great in my class” are just a few of things you might see on a professor’s progress report. While most times, professors will be the ones creating progress reports for students, sometimes advisors will as well. This is the advisor’s method of creating a progress report. Check the box next to the course and click Create a New Progress Report button.
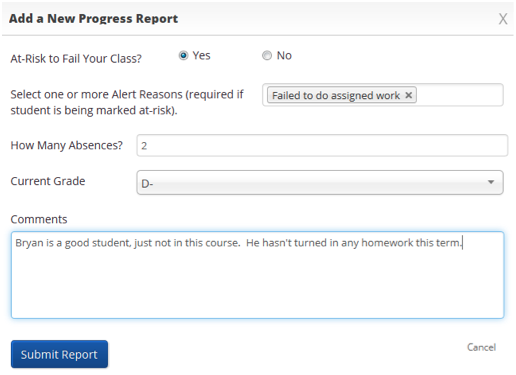
The first field is At-Risk to Fail Your Class? If you answer “Yes”, then you must select an Alert Reason (These Alert Reasons should have already been defined by your GFA.) Next you may enter How Many Absences? this student has accrued in this course. If you do not know, you may leave this field empty. Select the student’s Current Grade, if known. Again, if you are unsure, you may leave this field empty as well. Lastly, you may enter a Comment about the student and click the Submit Report button. This progress report is now attached to the student and can be view at any time by clicking on the Report/Notes tab on the student profile page (more on this later).
Drop Class
Classes will Add and Drop automatically as GradesFirst syncs to your institution’s student information system. However you may find a rare occurrence when a dropped course is still on a student’s schedule. When this happens, you check the box beside the course’s name and then click the Drop Class button.
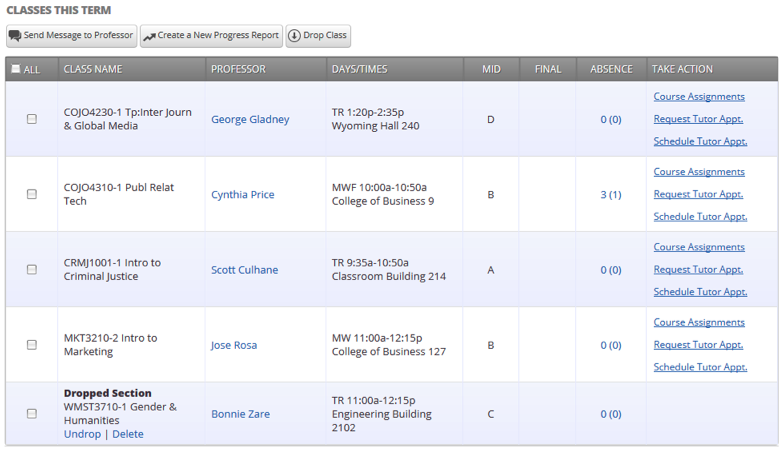
The course will then appear in the Dropped Section of the student’s Classes this Term grid. And don’t worry, if you make a mistake, you can always Undrop the course and it will return to active status. No harm no foul. Also, when GradesFirst and your institution’s student information system sync back up, it will make sure each student’s schedule is accurate, regardless of your manual changes.
Appointments tab. The Appointments tab will display all the student’s Upcoming, Recent, and even No Show appointments.
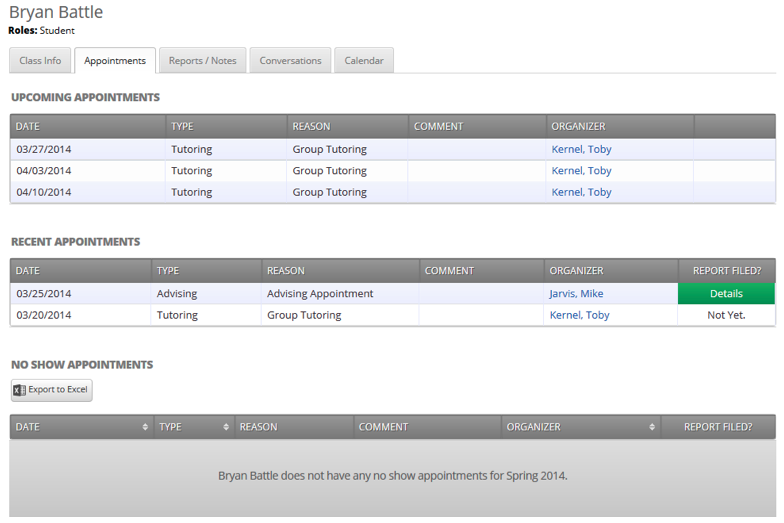
This is a great source of information when you want to quickly see all of a student’s appointments and whether or not they attended.
Reports/Notes tab. Perhaps one of the most informational tabs on the student’s profile is the Reports/Notes tab. It contains information on Cases, Alerts, Progress Reports, Advisor and Tutor Appointments and Notes about a student.

- Open Cases. Cases are like “case files”. When a student is marked at-risk, a Case (or “case file”) can be opened in order to follow up with that at-risk student. A case let advisors record what actions transpired to help the at-risk student. This grid will display all cases that have been opened for that student and the Manage Case button will let the advisor add an activity to the case.
- Alerts. Alerts and Cases go hand-in-hand. When a student is mark as at-risk, an alert reason must be selected. Each alert reason that a student receives will be listed in this grid.
- Progress Reports. This grid will display all progress reports that have been created for that student. The advisor can use the Detail link to see more information about any report.
- Advisor Reports. The Advisor Reports grid will list all of the advisor reports that have been filed for that student. Remember, an advisor report can be filed after an advising appointment and even when there isn’t an appointment at all. Click the Details link to see more information about the report.
- Tutor Reports. Just like the Advisor Reports grid, this grid lists all the tutor reports that have been filed for that student. Remember, tutor reports are filled out by tutors after a tutor appointment. Click the Details link to see more information about the report.
- Notes About Student. All Notes that have been created for a student will be listed here. Advisors will be able to click the Edit link to make necessary changes to any note.
Student Status. Also on the student profile page we display a student’s at-risk and study hall status.
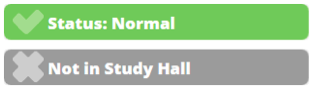
Status. A student’s status can either be Normal or At-Risk. All student’s default to the Normal status. When a student is deemed to be at-risk, the advisor must manually make that change (see page 4).
Study Hall Status. This is a real-time indicator that lets the advisor know if the student is currently checked into study hall.
This concludes our brief detour of the student profile page.
Upcoming Appointments
The purpose of this tab is to give the advisor a quick and easy view of all of their upcoming appointments.
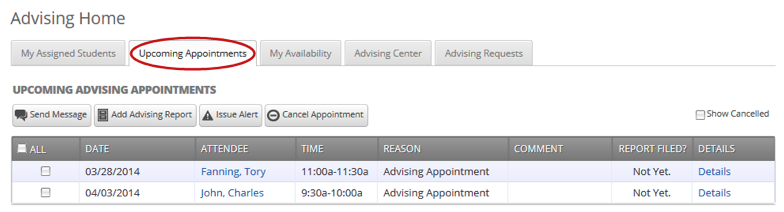
We also provide the advisor with the necessary tools they need to manage those upcoming appointments. These tools are:
Send Message. Quickly and easily send your appointment attendee a message by checking the box and click Send Message.
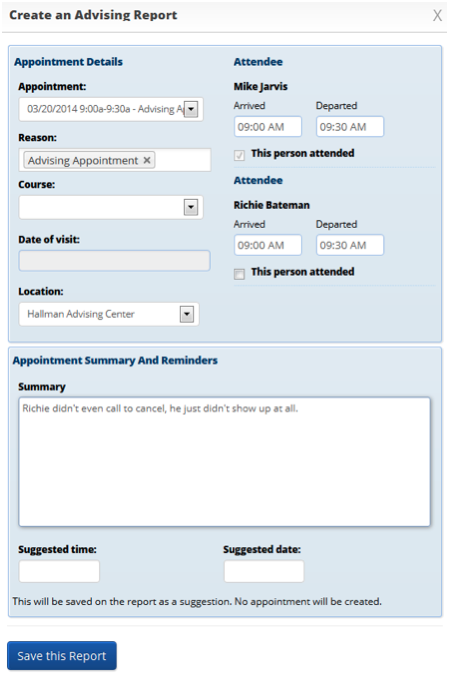
Add Advising Report. Most of the time the advisor would wait until after the appointment to file an advising report, but this button gives them the option to file it before.
Issue Alert. Advisors are given an option to issue an alert to a specific student even before their appointment. However like above, most of the time, this would be done after the advising appointment.
Cancel Appointment. Need to cancel an appointment? Check the appointment and click the Cancel Appointment button.
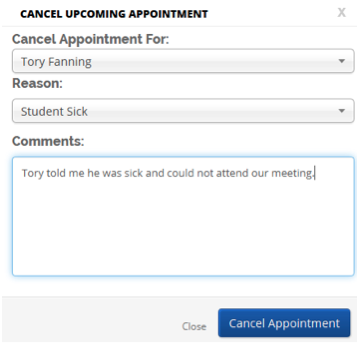
The advisor is given the option for whom to cancel the appointment for, also select a reason why the appointment is to be cancelled and lastly enter a comment. Clicking the Cancel Appointment button will instantly send out Cancellation Emails to all of the attendees alerting them the appointment has been cancelled.
Show Cancelled. By default, the Upcoming Appointments grid will NOT show cancelled appointments. Check the Show Cancelled check box to include cancelled appointments in the list of upcoming appointments.

As a last note about the Upcoming Appointments tab, as soon as the appointment starts, it will drop off this list and appear on the Recent Advising Appointments grid. For example, if an advisor has an appointment today at 9:30am, as soon as the time reaches 9:30, that appointment will be dropped from the Upcoming Appointments list and added to the Recent Advising Appointments list.
Advising Center
The Advising Center tab was created to work with our Advisor Center Kiosk functionality. Advisors will use this tab to monitor incoming students to your center. GradesFirst will track the following students:
a) Student who have arrived for their scheduled appointment.
b) Students who are waiting to meet with them.
c) Students who are waiting to meet with the first available advisor.
d) Students who are waiting to meet with another advisor.
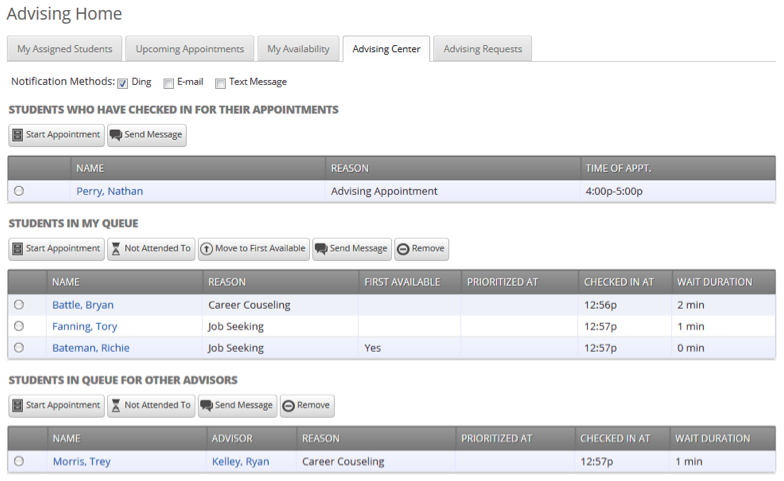
Notification Methods. These are the methods each advisor can define to choose exactly how they want to be notified when a student has checked into the Advising Center. There are three options: Ding, E-mail and Text Message.
Students Who Have Checked in for Their Appointments. This grid shows any students who 1) have an appointment with you and 2) have check in, and are waiting, to see you. In other words, the student is in the waiting room ready to see you. When you are ready to meet with the student, click the circle beside the student and press the Start Appointment button. Doing this starts the appointment and brings up an advising report for you to fill out at the conclusion of the appointment.
Send Message. You can use this option to send a message to a student.
Students In My Queue. This grid displays students who are waiting to see you, or the first available advisor. The list is sorted by placing the student who checked in first at the top. Along with this grid, you have given several options to manage the list of students.
Start Appointment. This button works the exact same way as it does in the above grid.
Not Attended To. This button should be used when there is not enough time to meet with a student and you have to send them away without meeting with them.
Move to First Available. This button should be used when a student wishes to change from your waiting list to the first available waiting.
Send Message. You can use this option to send a message to a student.
Remove. You should use this button when a student leaves without first meeting with an advisor. You should then “Remove” them from the list. This is different than the Not Attended To option in that the Not Attended To option the student actually waited to meet with an advisor but there was not enough time while the Remove option is for when the student leaves, on their own accord, without meeting with an advisor.
Students in Queue for Other Advisors. This grid lists students who are on the waiting list for other advisors. This is perfect for when advisors want to help other advisors meet with their students. They can simply select one of the advisor’s students and click the Start Appointment button.
Advising Requests
This tab displays students who have requested a meeting with their advisor(s). We give users the ability to sort these requests by a location, making it easy to focus on a specific group of requests.
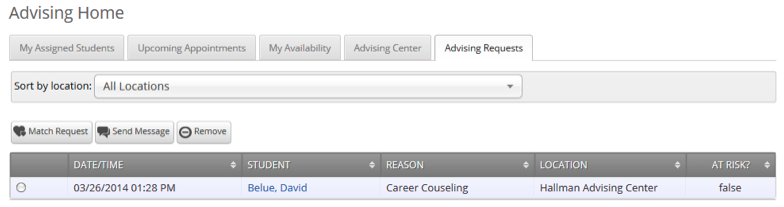
Match Request. The Match Request button opens up the Schedule an Advising Appointment window where you can select a specific day and time in which to meet with this student. On a side note, it is very important to read the Requested Meeting Time message from the student when creating your appointment.
Send Message. You can use this option to send a message to a student.
Remove. This option lets you permanently remove an advising request from this grid.
Issue Alert
In GradesFirst you have the ability to issue an alert on a student at any time. While we talked about Alerts earlier in this guide, as a reminder, Alerts are a way to draw attention to a student who may potentially be at-risk to leave your institution (for whatever reason). To issue an alert, click the Issue Alert button.

An Issue Alert popup will appear and it should look similar to the one you see below.
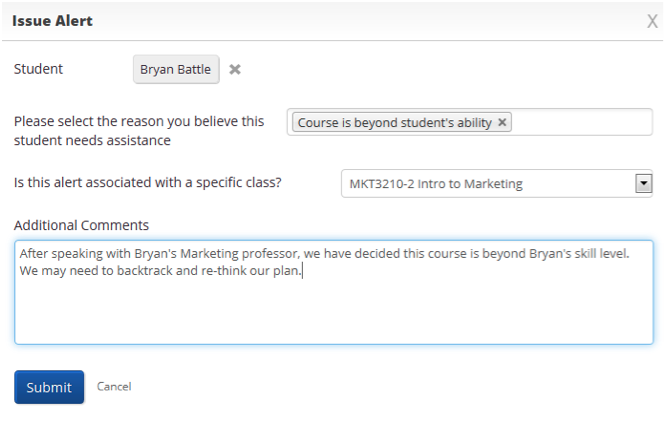
Student. Type in the name to search for and select the student you wish to issue the alert for.
Alert Reason. Select the Alert Reason that best describes the reason you issued this alert.
Associated with a Class? If the alert is associated with a specific course, you can select it here. Otherwise, leave this blank.
Additional Comments. This is where the advisor should write, in detail, the reasoning behind this alert. It is important to be as specific and detailed as possible with your commentary.
Remember, when an Alert is issued, a Case (or Case File) is then made. These cases can then be followed, and managed, by clicking on the Cases page. Don’t worry, we will cover Cases in great detail later in this guide.
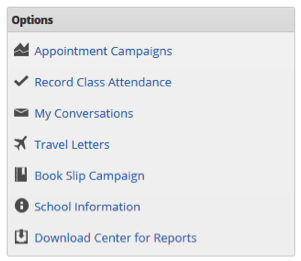
Options
The options area of your Advisor Home page is where the “modules” of GradesFirst live. See below for a list of what options are available to you.
Appointment Campaigns
The feature enables the advisor to request that specific students select a specific date and time in which to schedule an appointment instead of the advisor creating appointments for each and every student (which can be a time consuming task). This feature is commonly used when an advisor must meet with all of their students at least once per term. To begin, click on Appointment Campaigns > under Options > Create a New Campaign and follow the screens illustrated below. See below.

Enter the Name of Campaign the name of the campaign only appears to the advisor. This needs to be a name that makes sense to you.
Topic of Appointment. The topic will be the subject of the email going to the student. Something descriptive is most helpful here.
Special Instructions to Student This will be your message to the student
Choose the advisors for the Appointment Campaign will let you select multiple advisors if desired. For instance, if you want a student to meet with you or any other advisor, select them here.
Choose the Start and End Date. This will be the date range for which you want the students to make their appointments.
Length of the Appointment. This is where you define exactly how long the appointment will be. Durations include 10, 15, 30, 45 and 60 minute intervals.
Appointments Limit. This will determine how many times appointments you wish the student to schedule.
Location. Select the location of where the appointment(s) will be held
Once the Campaign Details are created and the selections are defined, the next step is adding recipients. Let’s click Select Students to Invite here you can use the tabs to search for recipients in several ways.
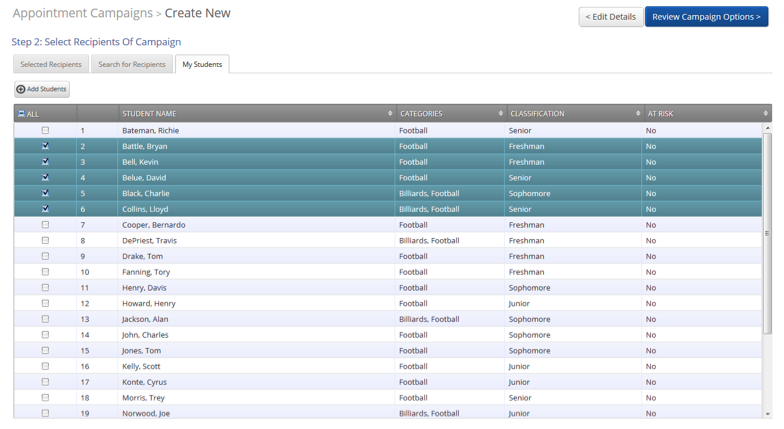
You have several ways in which to search for, and select your students.
They are:
Search for Recipients: provides users with advanced search filters to find, and select, students
Search by My Students: search for students that are assigned to me
Search for Students for other Advisors: search for students that are assigned to other advisors
When you select student from a tab, click Add Students, before moving to the next tab, to add those students to your Appointment Campaign. When you have selected all desired students, click Review Campaign Options. This is where you will be able to preview your entire campaign before sending it out. See below for an example.

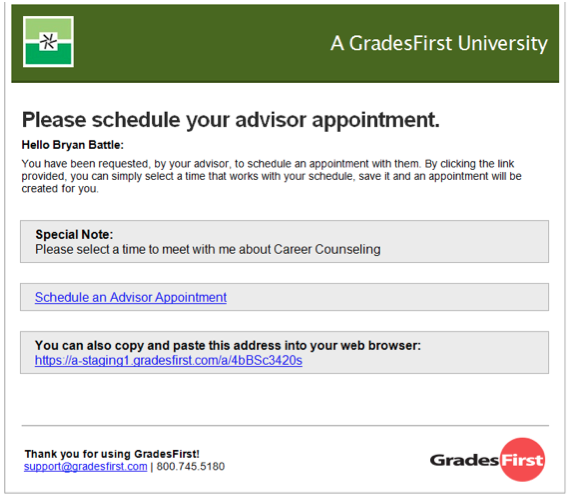
Please make sure that you review your selected options before you start the campaign. Because once you click the Start Campaign button, emails will be sent to all your selected students. Below is an example of the email your students will receive.
GradesFirst gives you several tools to help better manage your Appointment Campaign. After you create, and send your campaign, you will then be able to “manage” it with the below tools.
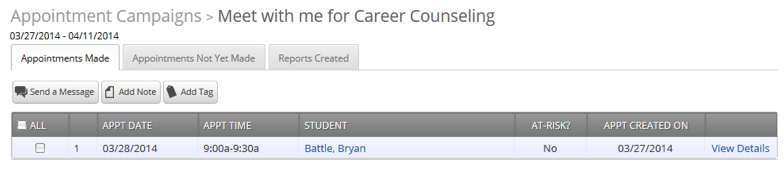
Appointments Made. This tab will let you see which students have made appointments. Not only can you view those students, but you can also Send a Message, Add Note, and/or Add Tab for those students.
The Appointments Not Yet Made tab will display those students who have not yet made their appointment(s).
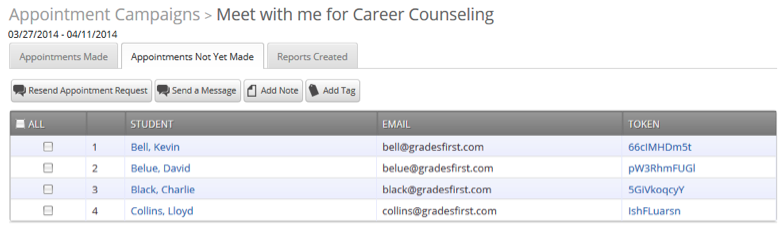
Resent Appointment Request. This option will let you resend the appointment campaign email to selected students. This is great, for instance, if a student accidentally deletes the original email.
As well as on the previous tab, advisors have the ability to Send a Message, Add Note, and/or Add Tag to selected students.
Reports Created. This tab will display all advisor reports that were created for the appointments made during this campaign.

As with the other tabs, you have the options to Send a Message, Add Note, and/or Add Tag to selected students.
Appointment Campaign Options
Lastly, when you are managing your appointment campaign, on the right-hand side will be Options.
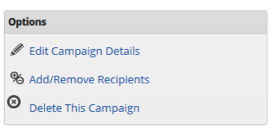
Edit Campaign Details. With this option, you can edit anything about the appointment campaign. When those changes have been saved, they will automatically apply to all students who still are required to make an appointment. Students who have already created their appointment(s) will not be affected by the changes.
Add/Remove Recipients. Like the name suggests, this option will allow the advisor to either add or remove students to this campaign.
Delete This Campaign. You can use this option to delete an existing campaign. However, deleting this campaign will NOT remove any already created student appointments.
Record Class Attendance
While normally professors would, and will, take classroom attendance in GradesFirst, we do make that option available to advisors as well (if you have the proper permissions).
Note: If your institution does not take classroom attendance then you may skip this section. If your institution does take classroom attendance, but does not allow advisors to do it, then you may also skip this section.
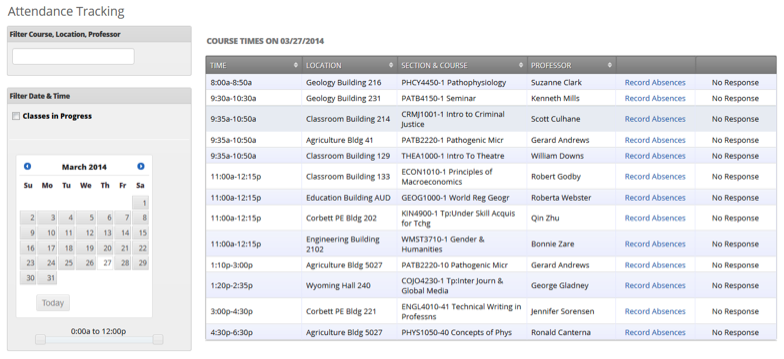
Before you can take attendance, you must first locate the course for which attendance is to be taken. You can use the Filter Course, Location, Professor to automatically narrow down the search grid. For instance, if you wish to look for only those courses offered in Saban Hall, simply type in “Saban” in the filter and press <enter>. The search grid will then automatically narrow down the results and only show you those courses offered in Saban Hall.
...
Once you find the course, for which you wish to take attendance for, click the Record Absences link and you will be taken to a new screen. It should look similar to the one shown below.
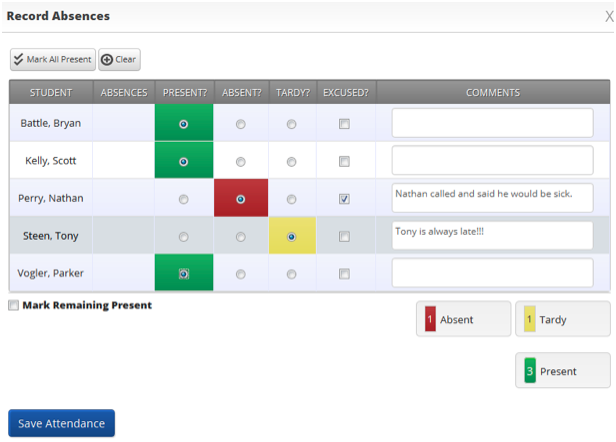
This screen works pretty much like it looks. Advisors are able to mark students Present, Absent (excused), Absent (unexcused) and Tardy. Comments can also be given on a per student, per incident basis.
My Conversations
The My Conversations link and Conversations tab take you to the exact same page. We will go into more details on Conversations later in this guide.
Travel Letters
Travel Letters within GradesFirst are based on the premise that due to an activity, students are going to miss one or more of the following: Courses, Appointments and/or Assignments. Travel Letters will help you notify the students on the courses, appointment and assignments they will miss as a result of traveling. Also, it will let professors know which students will miss their courses. Good uses of Travel Letters are sporting events, on campus mentoring groups and/or student government trips or meetings. Creating a new travel letter is easy.
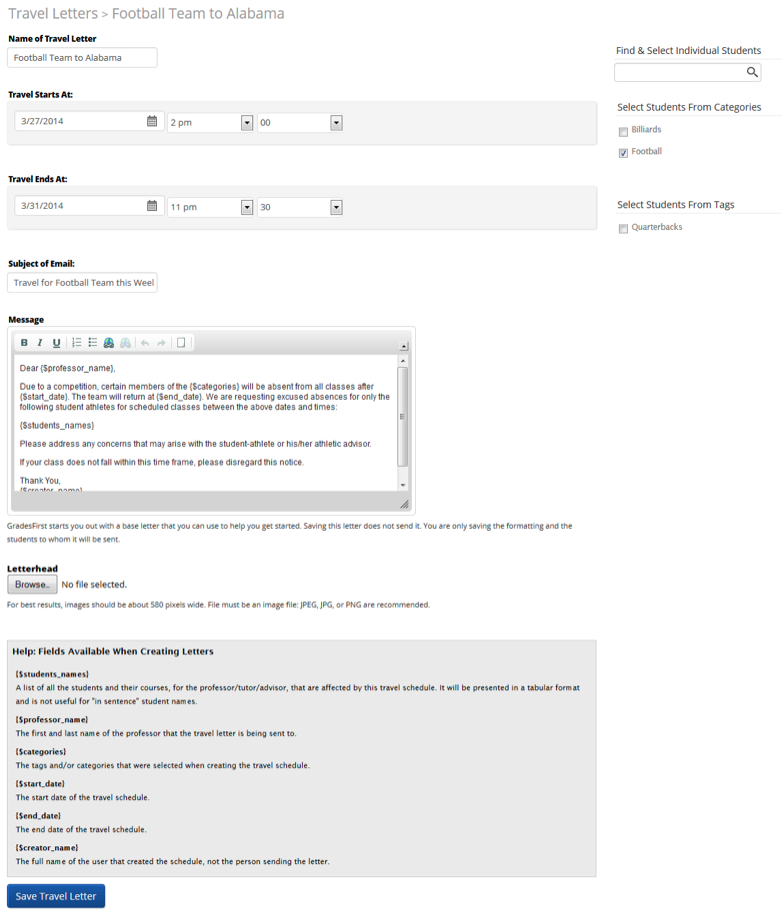
Name of Travel Letter: Enter the name of your travel letter. This name only appears on the main travel letters page and therefore will not be seen by students or faculty members. So feel free to “name” the travel letter something that makes sense to you or your advisors. An example of a valid name could be something like “Football Championship 2011”.
Activity Starts/Ends: Define the start/end date and time around your travel letter. GradesFirst will use these dates and times to determine which appointments, courses and assignments students will miss. It is therefore very important to ensure these dates are correct.
Subject of E-mail: As the name implies, the subject will appear as the subject line of the E-mail sent to your professors. Given its importance, and the fact that it will be seen by your professors, great consideration should be taken when defining this. An example of a subject could be “Please excuse the football team for the Football Championship 2011.”
Message: The message is where you can provide details, about the activity, that will appear in both the E-mails and letters sent to your professors and students. By default, the letter contains a default message along with specific merge fields to help you personalize the content your professors will see. We offer up the following fields for you to use:
- Professor names
- Start and end dates (and times)
- Student names
- Creator’s name (the person who created the travel letter)
- Categories (this field is not currently in the letter, but is available for you to use if desired)
Select Students: Use the Categories and/or Tags to define exactly which student will be included in this travel letter.
Letterhead: This option allows you to browse out to a file on your desktop and add it to the Current Letterhead field. Once this is done, you will be able to print your letters on school letterhead for distributing.
After defining your travel letter, click ‘Save Travel Letter’ to save. Upon saving, GradesFirst will immediately start to “process” your letter. This process may take a few minutes to complete, so don’t be alarmed if, when you click on the Students tab, you don’t yet see any students. Students will appear when the process completes.
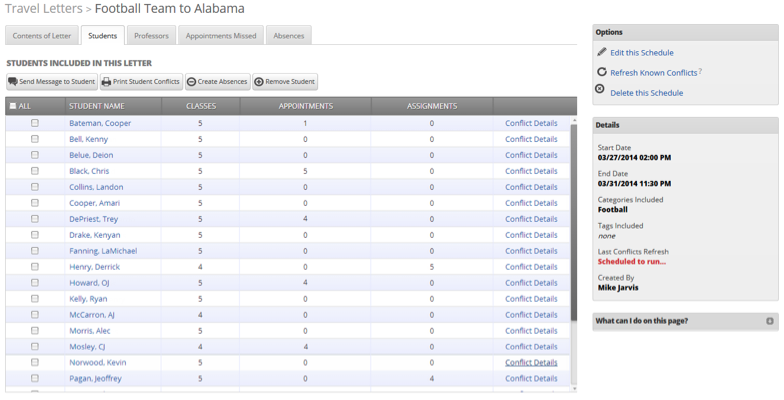
Students Tab
What do I do now? Well, good question. The answer is rather simple; you won’t need to do anything until just before the start date of the activity. For instance, in the example below, my football team will be going to the play football at Alabama. So my travel letter will ask the professors to excuse my athletes starting on 3/27 at 2:00 pm and ending on 3/31 at 11:30 pm.
At the time you create your travel letter, GradesFirst will look for existing events (e.g. student appointments, courses and assignments) to determine what your students will miss. It is important to note that GradesFirst will NOT look for scheduled events again until you manually run ‘Refresh known Conflicts’. In other words, your list of appointments, courses and assignment students will miss will only be as current as your last known “refresh”.
For instance, in the example above when I created this travel letter on 3/27/2014 for my football players and clicked save, GradesFirst recorded the courses, appointments and assignments that students will miss during the Football trip to Alabama. Please keep in mind, GradesFirst will only record those courses, appointments and assignments that were in GradesFirst at the time I created the travel letter. So if I were to add appointments, assignments, or schedule changes AFTER I created the travel letter, the ‘Refresh known Conflicts’ should be used to add those missed events to the travel letter.
A Best Practice would be then to, the day you want to send the E-mails or print the letters for the professors, run the ‘Refresh known Conflicts’ in order to make sure GradesFirst includes any new appointments, courses and assignments that have been added to the student’s schedule since the creation of the travel letter.
Other things that you can do while on the student tab include ‘Send Message to Student’ and ‘Print Student Conflicts’. You can also choose to view ‘Conflict Details’ if you would rather see what a student will miss onscreen.
Both the ‘Conflict Details’ and ‘Print Student Conflicts’ will show the user the same information, but different ways. The ‘Conflict Details’ link will give the user a quick view of events the student will miss during the scheduled events while the ‘Print Student Conflicts’ link gives the user the ability to send those missed events to the printer.
You can now also create course absences for those courses that will be missed by your students. While this is not a required step, it is recommended for those institutions who are taking classroom attendance. Simply select which students you wish to mark absent, click the Create Absences button and let GradesFirst do the rest. This process can take some time depending on the number of students and courses being missed. To see the end result of this process, click the Absences tab and GradesFirst will display for you each missed course for each student.
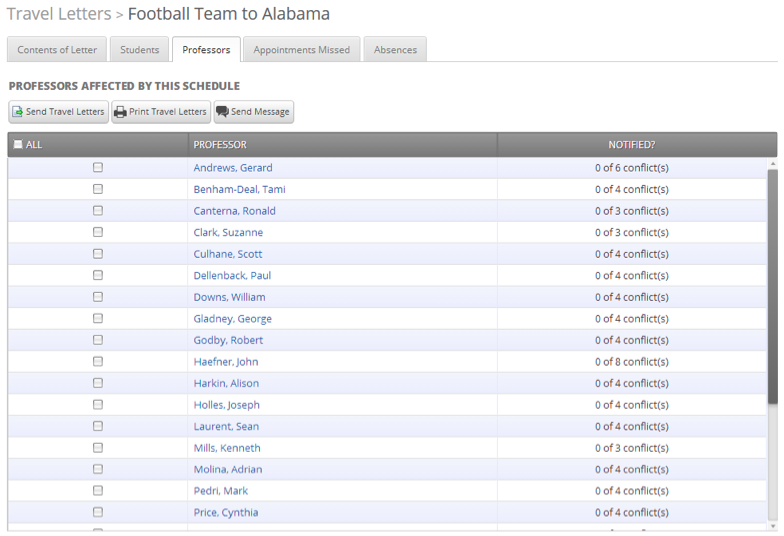
Professor Tab
Much like on the Student Tab, the user has many of the same options available to them with the exception that this tab focuses on corresponding with professors instead of students. This is where you will keep your professors informed as to which students will miss which courses.
Important Note: As previously suggested, it is imperative that before you print or send travel Letters to your professors that you run ‘Refresh known Conflicts’
After the ‘Refresh known Conflicts’ has been run, you are now ready to correspond with your professors to let them know which students are going to miss their classes. Options available to you on this tab are:
Send Travel Letters – This will send a travel letter E-mail, along with a list of the professor’s classes and students that will be missed during the travel letter’s time period. In other words, everything a professor will need to know to excuse your students during the event.
Print Travel Letters – This will display a report, onscreen, that you may send directly to the printer. Use this for more of a hardcopy that you can hand to your professors if E-mail is not your desired way of correspondence.
Send Message – Want to send an E-mail your professor(s), this method is for you. This option will let you send a custom E-mail to your selected professors.
Appointments Missed Tab
This tab will be used to correspond with your Advisors, Tutors or students for appointments they will miss during the scheduled activity. Please see the screenshot below to outline what options are available to you.
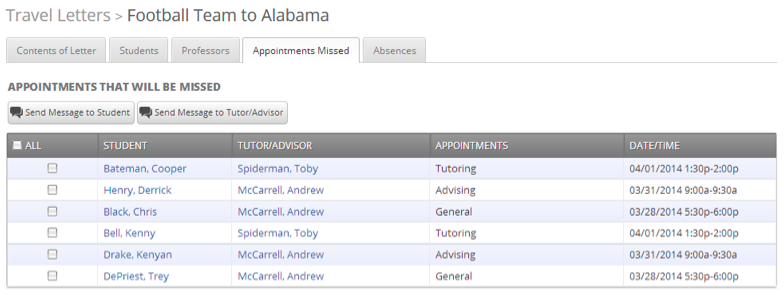
Consider this tab as a means to simply contact or communicate with students, tutors or advisors who will be affected by this travel letter. For instance, in the screenshot above, GradesFirst will display all appointments that will be missed during the Football trip to Alabama.
Again, please keep in mind that if appointments have been created since the creation of this travel letter, please use the ‘Refresh known Conflicts’ link to make sure those are included on this tab.
Absences Tab
The Absences tab is especially important for those that mark attendance in GradesFirst. This tab will be used to ‘Create Absences’ for students and manage those absences based on an activity. To mark a student absent, simply go to the Students tab. From here, you can select the students that apply and click the ‘Create Absences’ button.
Note: Creating absences may take a few minutes to fully complete, so do not be surprise if the Absences tab is still blank immediately after starting the process.
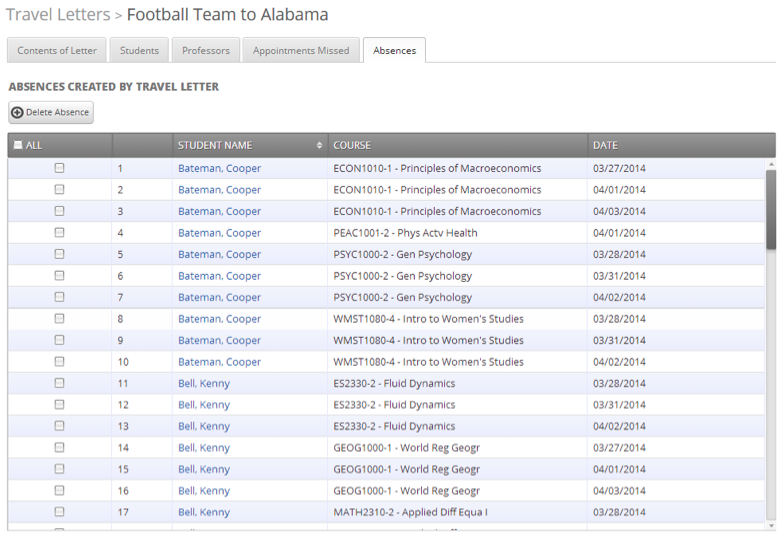
To Delete an Absence for a student you will simply check the box associated with that student and then click ‘Delete Absence’.
School Information
The School Information option will let advisors define and post relevant information to your students. This could be information like Office of Registrar information or Campus Police contact info. Any information you deem important for students to have access too can be define here. Below is an example of what kinds of information you can define.
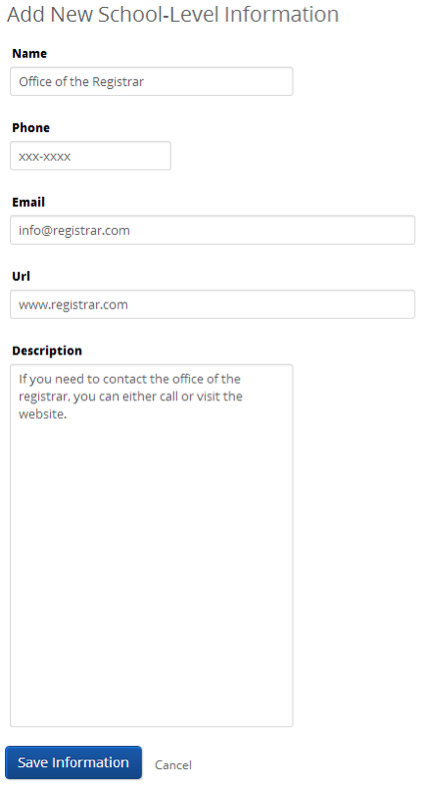
When saved, students, or even other users, will be able to see your saved information in their own Options area
Upcoming Appointments
Back on the Advisor’s Home page is a section for Upcoming Appointments. This area will display the advisor’s next eight advising appointments. You may click on the title of the appointment to view more details. You will also find out more detailed information on the Upcoming Appointments tab as well.
Advisor Reporting
Towards the bottom of your advising Home page is an area called Advisor Reporting. This is where you will find a listing of all your previous advising appointments and advising reports you have filed.
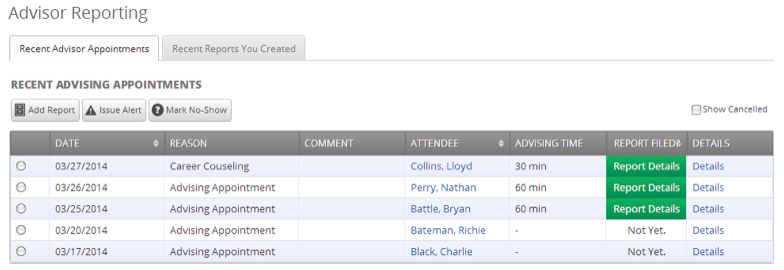
Recent Advisor Appointments
This tab display all the previous advising appointment you have had as an advisor. It is here that you will find your previous advising appointments so that you can fill out their advising reports. You have several options available to you.
Add Report. Like the name implies, select an appointment/student you wish to file an advising report for and click this button.
Issue Alert. This is yet another way to issue an at-risk alert for a students. Select an appointment/student and click this button.
Mark No-Show. When a student fails to show up for the schedule appointment, advisor can mark them as a no-show with this option.
Tracking students who regularly fail to attend appointments is easy in GradesFirst. Once a student is marked as a no-show, advisor can click on the Reports tab > and run the Advisor No-Shows report for a detailed report on every no-show instance.
Show Cancelled. As with many of our grids, we purposely exclude appointments that have been cancelled, so in order to include those cancelled appointment, simply check this box.
Recent Reports You Created
Need to see a quick list of all the advising reports you have created for the term? This tab is for you.
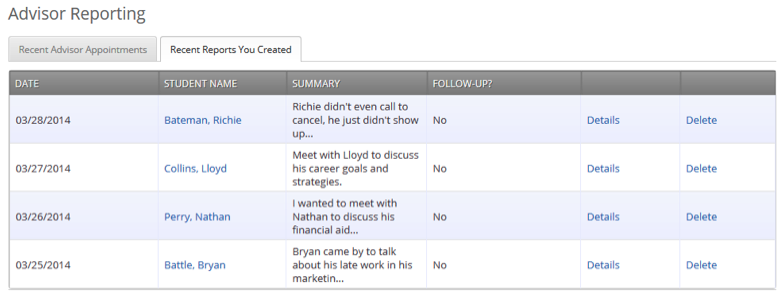
Sorted by the most recent report first, this grid will display all of your filed advising reports for easy access. From here you can click the Details link to view (and optionally Edit) a report or click the Delete link to completely delete the report. This is a great tab for quickly viewing your most recent advising reports.
...
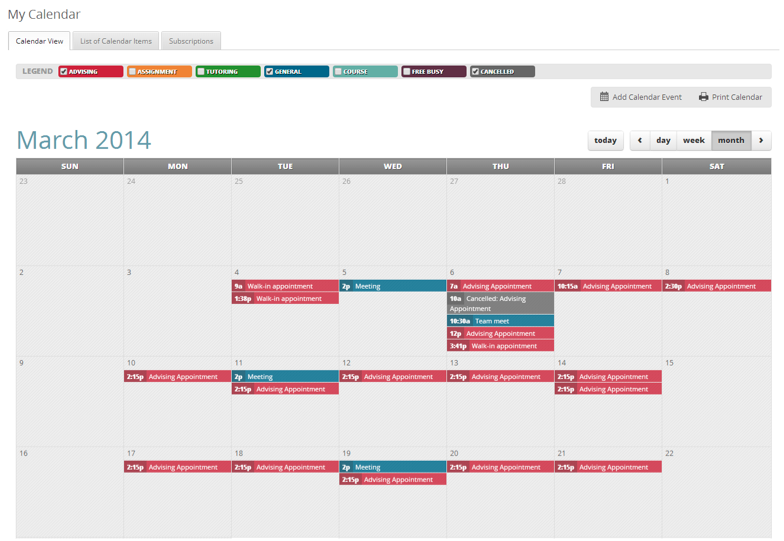
The Calendar View is a quick way for an Advisor to view appointments or events at a glance. Here are some key features:
- Add Calendar Event – Clicking Add Calendar Event will bring up your appointment scheduling page. Providing you with the convenience of creating an appointment right from your calendar screen.
- Print Calendar – Here you can print your monthly and weekly calendar views directly to a pdf format.
- View Today, day, week or month – Quickly choose to view just Today, or view by day, week or month. Using the left or right arrows allows you to view previous or future dates if desired.
Notice the Legend just above the calendar grid. Options listed include: Advising, Assignment, Tutoring, General, Course, Free Busy and Cancelled. Selecting one of the checkboxes enables the option to show on the calendar grid and deselecting the checkbox disables the option (These options are automatically checked by default).
What an advisor is allowed to do on this calendar page can vary based on the permissions that are assigned to them. For example, in order to use the drag and drop calendar functionality (moving one event from one day to another), the advisor would need permission to update an appointment. This permission is called Appointment Update and is defined by the user role assigned to you by your GradesFirst Administrator.
If you are not able to update, move or delete appointments, please contact your GradesFirst Administrator to see about adjusting the Advisor Role assigned to you.
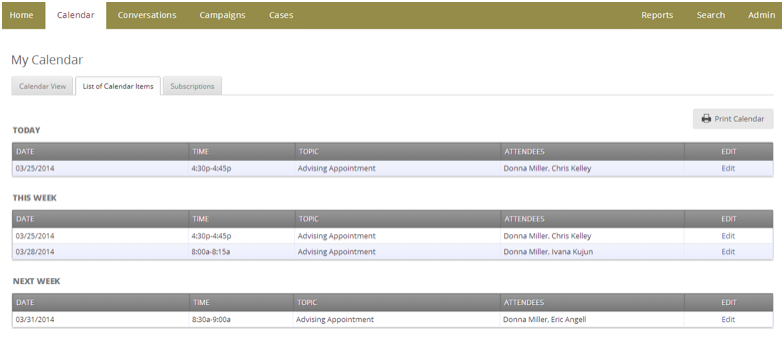
List of Calendar Items
The List of Calendar Items tab provides in list form any appointments you have on schedule for Today, This week and Next week. There is also a Print Calendar option available for this view. If you have the permission to update appointments given by your GradesFirst Administrator, then an option to Edit will also be available to you. Notice the Edit link on the far right side of each appointment listed.
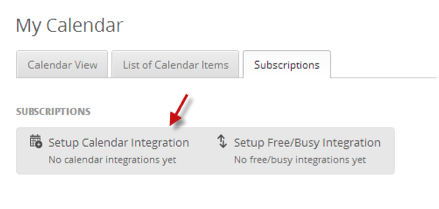
Subscriptions
The last tab on the Calendar is called Subscriptions. Subscriptions provide you the ability to integrate an external calendaring application e.g. Outlook, iCal, Google Calendar, Zimbra Calendar into GradesFirst. In addition, the Free/Busy integration looks for appointments you have created in your external email calendar application and then updates them by adding a block of time to your GradesFirst calendar called “Free/Busy”.
First, let’s hover over and click on the box named: Setup Calendar Integration.
You will then be directed to the External Calendaring Setup screen that will walk you through the steps of setting up your calendar integration depending upon the external application that you use.
Note: That each external application has a designated tab of its own for your convenience.

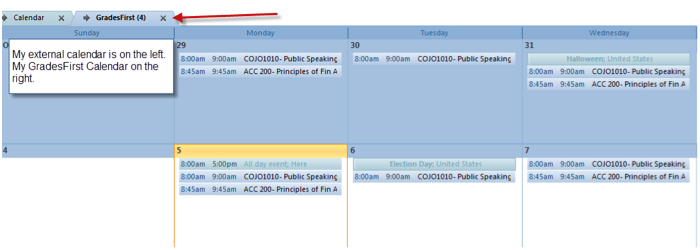
Once your subscription is complete, you will immediately see a new calendar side by side your existing calendar in your external email application. The benefit of this subscription will provide you better visibility for appointments that exist in GradesFirst along with those that exist on your current email calendar.
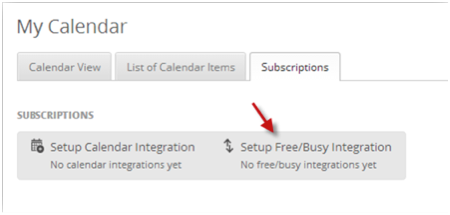
Next, you will have the option to setup your Free/Busy Integration. The Free/Busy subscription sends any appointments that you have created in your external email calendar to GradesFirst and then updates them in GradesFirst by adding a block of time called “Free/Busy”. One thing to note here is that the appointment details for the appointment you created in your external email calendar will not be visible to others in GradesFirst, but they will simply see a block of time called “free/busy”. This assures your privacy and that others can quickly see any time slot where you are scheduled as “busy” and will not be available. Not only are you able to keep track and manage appointments more efficiently using these subscriptions, but will also be able to view potential availabilities in real-time.
Let’s hover over and click on the box named: Setup Free/Busy Integration.
You will notice there are two tabs in the screenshot below, one for Windows Outlook Integration and the other for Mac Outlook Integration. The Windows Outlook integration has several versions to choose from. Clicking on one of those versions will open the step by step instructions on setting up your subscription and also provide you with troubleshooting steps if needed.

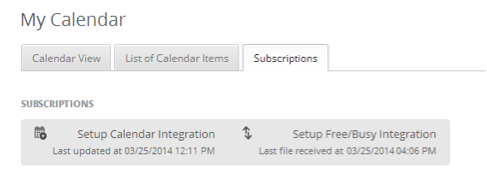
Once you have finished your integrations, you will notice under the Subscriptions tab a date and a time now show signifying when each one was last updated.
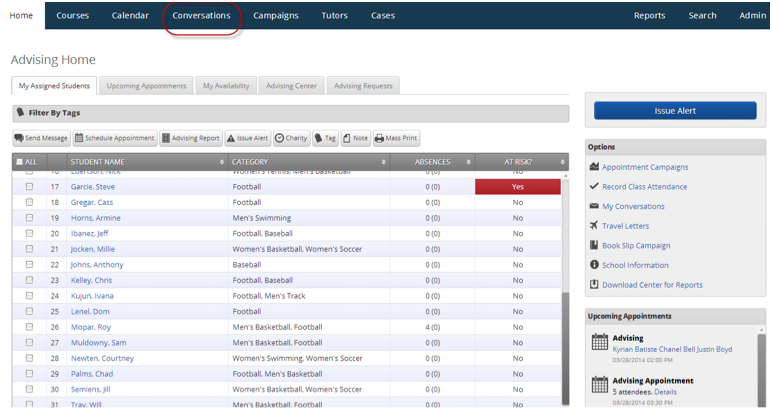
Conversations
In today’s world, communication is key! We all like the ability to communicate at anytime, anywhere and the module, GradesFirst Conversations will do just that. This functionality helps Student Support Personnel communicate with students like never before such as emailing and texting students, emailing and texting non-students, click to call that provides you the ability to view incoming phone calls from students on your desktop and the conversations tab for keeping up with all of those communications.
Conversations bridge the gap between how student support personnel need to communicate with students and also how students want to communicate with them. Through GradesFirst, everyone gets to communicate the way they want with no dead-ends. Advisors can send text messages to any number of students, and Conversations will enable them to reply the way they choose whether by text, email or phone calls. Each written message is routed to the advisor’s inbox and phone calls are routed to their office line. In a world of smart phones and social networking, student support is now fully connected.
Who is Student Support Personnel?
Student Support Personnel can be any user at your school that provides assistance to students. Such as advisors, faculty, tutors, administrators, coaches and in some cases other students.
What are the requirements for using Conversations?
- Simply contact us via support@gradesfirst.com and a GradesFirst CSM will enable the Conversations module via your school’s support site. This is called Communication Routing.
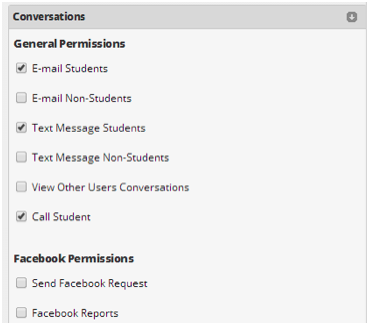
- Next, Conversations must be enabled for the user(s) wanting to use this functionality. Simply logon to GradesFirst and click on the Admin tab to continue to the permission settings for the user(s). If you do not have access to the Admin tab, please contact your GradesFirst Administrator for assistance.
- Updating the role for the user(s) can be edited by going to the Admin tab > School Information section> User Roles>click on the role to edit >click on the Conversations section>select the appropriate permissions and save. If a user needs to be updated instead of a “role”, navigate to the Search tab, search for the user and click Edit. Update the permissions as mentioned above.
Each user should have a dedicated GradesFirst cell and/or work phone number to take advantage of text messages and click to call e.g. a cell phone and work number for advisors and a cell number for the student.
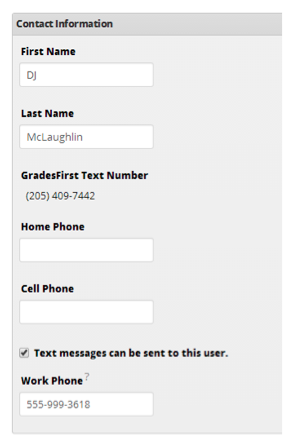
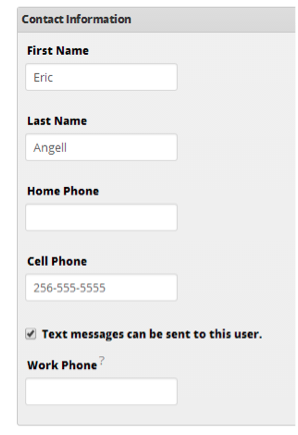
Advisor contact information Student contact information
Student Contact Information (cell phone)
It’s important that each student that will be receiving messages from the Student Support Personnel has a cell phone number saved on their student profile page. This can be accomplished by importing student data and including the cell phone numbers via import or by editing the user via the Admin tab as mentioned above.
Text Messaging Dashboard
Most of you probably will be familiar with the Text Message Dashboard especially if you already use GradesFirst and text messaging. Basically, this dashboard gives the user access to important text messaging information. Information isn’t the only benefit gained with the dashboard; users are also able to purchase more text message credits. To get there go to the Admin tab > Messaging Options >Text Messaging Dashboard.

Here, you will be able to view the dedicated text message numbers that you have assigned to persons sending text messages. To purchase additional numbers or assign text numbers, please contact your GradesFirst CSM or Support representative.
Next, on the right hand side of the page you will notice the Purchases This Term caption. You can quickly view the purchases made for this term and also have the option to purchase more credits if needed.
What is the difference between having Conversations and not having Conversations?
Having Conversations provides you with the ability to stay connected no matter where you or the student might be. As I mentioned previously, Conversations gives you added features such as reply to email or text messages and immediately shows the response in real time on your desktop. Phone calls show “imcoming call” from users and allow you to write notes concerning the call. These are valuable features you shouldn’t go without.
So how does Conversations work?
Each user has a Conversations tab in GradesFirst. Depending upon the settings that have been customized for your institution, the options could vary. Let’s talk about the basics.
Although it is the official means of communication for most institutions, e-mail is often underutilized and underpowered. GradesFirst provides you the ability to search recipients, send multiple types of messages on demand and dynamically stay in touch.
Send an Email
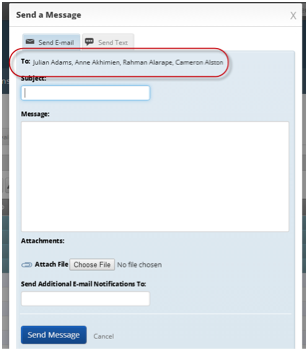
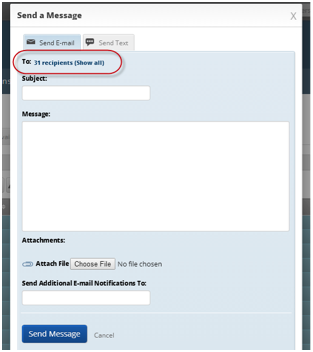
To send an email simply select the students from either your home screen via My Assigned Students or anywhere in GradesFirst that you can Send a Message, then click Send Message > Send Email > add in the subject, body, any attachments, or if you also need to cc a user you can fill in the Send Additional Email Notifications field with that users email address. Once done, click Send Message. Emails are captured in Conversations via the Conversations tab (we will review the Conversations tab in just a moment). Let’s start with an example of an email. In the example below, the student Chelsea is about to send an email to her advisor.
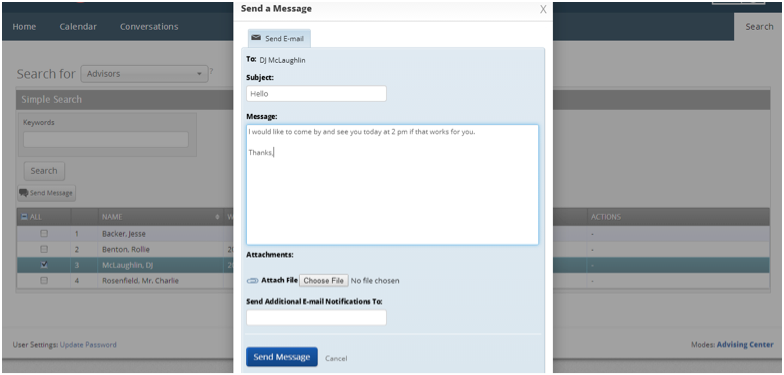
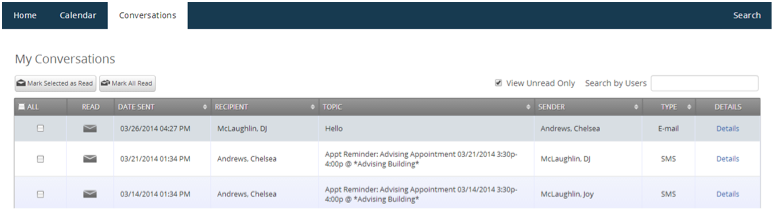
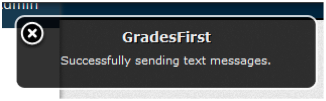
After filling in the message information and clicking Send Message, a pop up message will appear on the top right of the screen notifying her it’s been successfully sent.
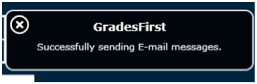
Notice the Conversations tab and the message “Hello” that now appears in her conversations. There are also some key features to note:
- Mark selected as read- this option allows you to select certain items in your conversations inbox and mark them as ‘read’ items.
- Mark all read- this option allows you to mark all of the items in your conversations inbox as ‘read’ items.
- View unread only- selecting this checkbox will only show ‘unread’ items only.
- Search by users- Using the search by users field, you can narrow your inbox search by first, last name or id.
- Details link- clicking the Details link will open the details of the message showing sender, recipient, date and time and the body of the message.
Clicking the Details link will open up the message like this:
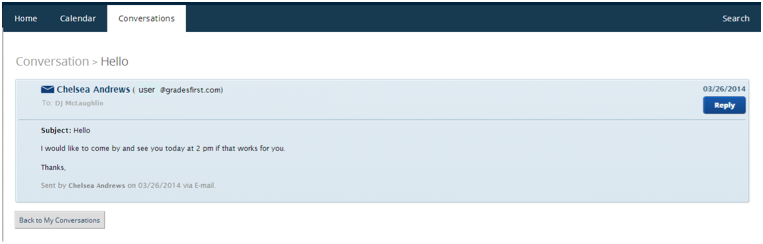
Notice you can click Reply to respond to the message or you may go Back to My Conversations tab. The next screen shows the advisor responding to the conversation.
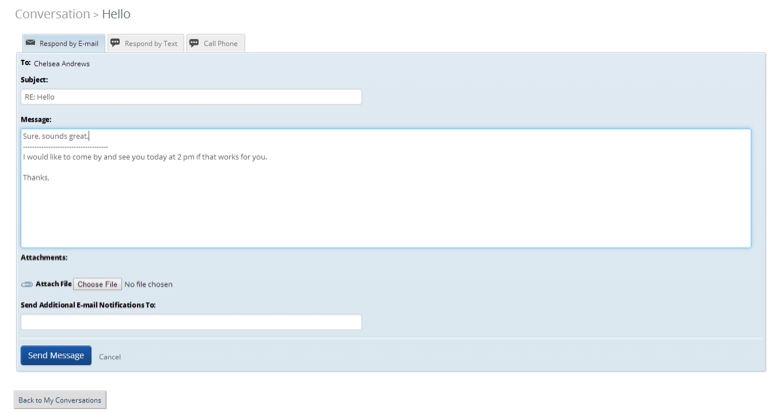
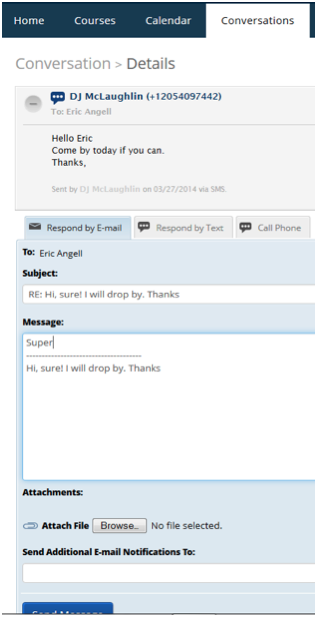
When the advisor responds, they have the option to Respond by Email, Respond by Text or Call Phone if permissible by their institution. After the advisor clicks Send Message the message will be recorded in the user’s conversations. You will now notice the conversation thread has expanded. Clicking on the plus sign will open up the additional segments of the thread.
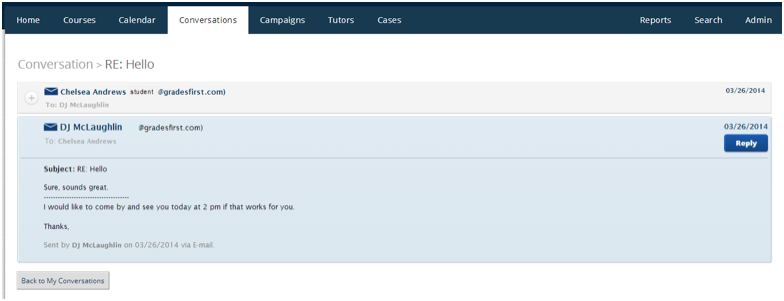
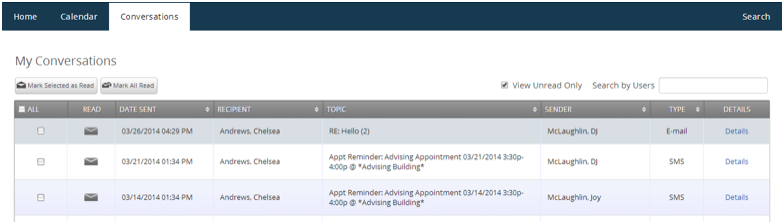
Now that the messages have been sent, there are a couple of things to note. First the response to the conversation is recorded and shows the number of responses now. Notice the message shown in the screenshot below has a (2) next to the topic. This gives you an idea of the number of responses that have occurred in any given message.
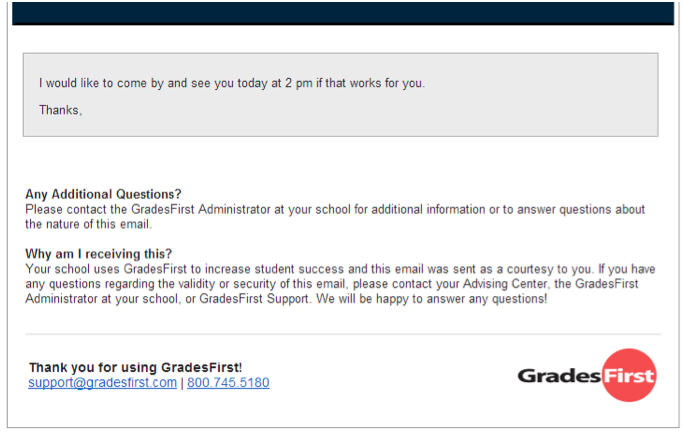
Next, emails will be delivered to the users in a conversation very similar to the one shown below. This is what makes GradesFirst Conversations so valuable. Messaging within GradesFirst as well as email delivery and next we will discuss sending a text.
Text messaging
The average young adult exchanges over a thousand texts each month. Since texts are often received and responded to quicker than e-mail, texting is a powerful tool for student engagement.
Send a text message
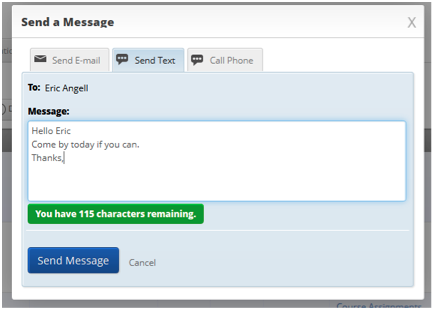
To send a text message select a student from either your home screen via My Assigned Students or anywhere in GradesFirst that you can Send a Message. Upon selecting the student, choose Send Message > Send Text. Here the advisor will choose to send a message to Eric, the student.
What happens next?
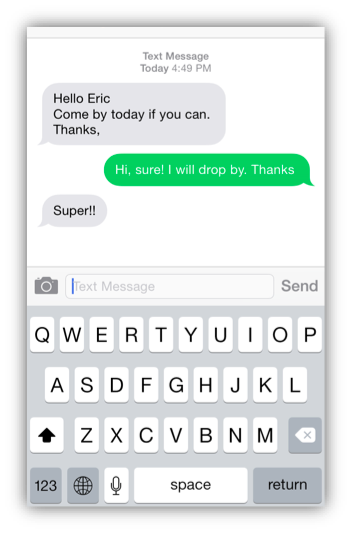
Text messaging is a great tool that allows the recipient e.g student to reply to a text message they have received on their phone and once they do, the sender would receive a message from the recipient in the following ways:
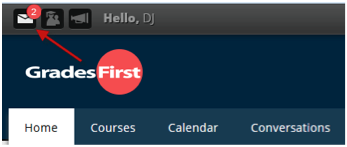
- While the sender is logged into their GradesFirst account, they would receive a pop up message box on the right side of their screen notifying them that a message from Eric has arrived.
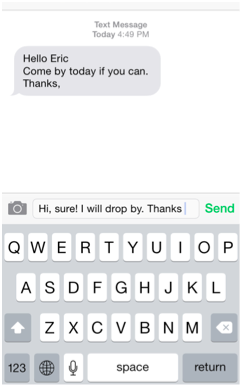
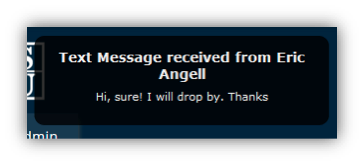
Message sent by Eric Message the advisor receives
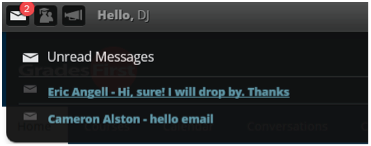
- In addition to this, the notification bar at the top left of the application will show an icon number (in red). This number will increase by 1 each time a message is received or decrease each time one is read. Clicking on the link of the message will navigate you to the conversation.
The advisor responds to the conversation by saying “Super” and clicks Send Message. Eric (the student) receives the response via text on his phone.
- Along with the pop up message and notification icon, Gradesfirst will also send an email notification to the sender’s email address on file.
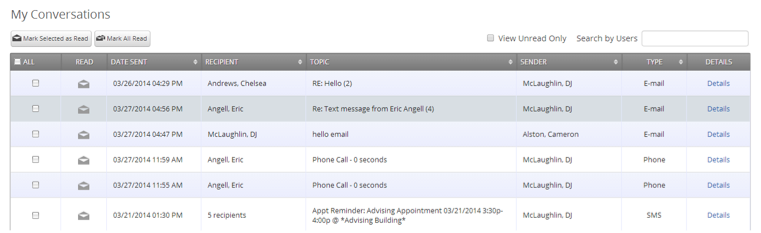
This message will be captured on the Conversations tab. (Below is a snapshot of My Conversations via the Conversations tab mentioned earlier in the guide). This will be your dashboard to view all types of messages such as SMS (text messages), Email (email messages) and Phone (calls).
Phone Call
This feature is a valuable piece of conversations that allows you to call your students cell phone from within the application and then take notes regarding your phone call. When each reply is made, the message becomes part of your GradesFirst conversation. Let’s look at some of the details.
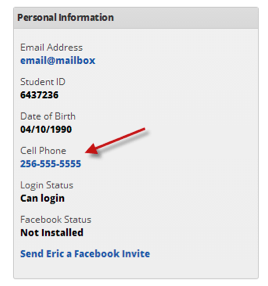
Call Phone- If a number is associated with the recipient; you will see that number listed in their Personal Information box via their profile page.
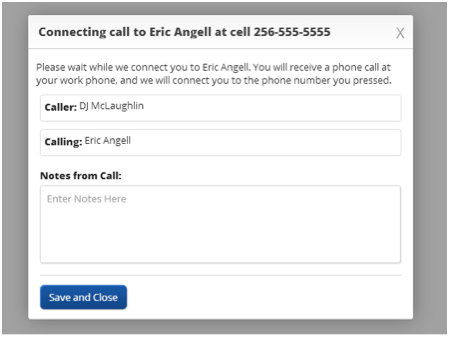
By clicking the link (phone number) in that box, a call is initiated and the work number that is associated with your user profile in GradesFirst will immediately start to ring. When you answer your work phone, you will immediately hear the call ringing the student’s cell number that you selected. A pop up will appear on your GradesFirst screen allowing you to fill in any notes regarding the call. Simply talk with the student, complete the call notes and then save. This call will now be recorded in Conversations.

What if a call is missed?
Great question! If an advisor or SSP person calls a student and the student doesn’t answer (granted voicemail is activated) you can quickly leave a message for that student via their voicemail. In addition, if the student sees that they missed the call on their cell phone and quickly presses to call the number back, the student support personnel will see an incoming call pop up message on their screen and their work phone will ring.
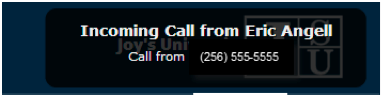
Simply, pick up the phone to be connected to the call with the student. By clicking on the pop up message on the screen, the Notes for the Call box will be visible. Enter your notes, and then save.
Overview of how to make calls
There are times that making a phone is just not substituted. With Conversations you will have the ability to call a student directly from within GradesFirst from their student profile page or any of the Send Message options within the application (with the permissions granted by your administrator). Let’s look at a couple of ways to make those phone calls.
- Select the student you would like to call either from your assigned students via your home page or by using the Search tab where you can search for any user you would like to communicate with. Select the user you would like to call and click the Send Message option. Click on the Call Phone tab. The cell phone number of the user should be visible > click the number > your work number will ring > once you pick up your phone you will now hear the phone ringing the student > Student picks up and you are connected. Enter your notes concerning the call and save. Once a user hangs up the call will be disconnected.
- You also can call a student by navigating to their profile page and in the student’s personal information box (right side of the page) you will see the phone number listed for that student. If Conversations is enabled, the phone number for the student will be clickable. At that point of clicking the student cell number you will immediately be calling the student just as we walked through in the above example.
Can I call more than one student at a time? No. Actually you will only be able to call one student at a time.
Can I email more than one student at a time? Yes. You can select students by Advance Search using the Search tab and search by category, tag or simply select all of your assigned students and send them a message.
Selecting several students Selecting all of my assigned students
Can I text more than one student at a time? Yes. You can select more than one student at a time to send text messages to. However, if there is a student that doesn’t have a cell number associated with their profile in GradesFirst, the message will deliver as an email instead of a text message.
Campaigns Page
GradesFirst offer two forms of campaigns; Progress Reports and Enrollment Census. We will cover the Progress Report Campaign first.
Progress Report Campaign
The idea behind this new functionality was to give our users the ability to create a campaign for larger cohorts than what they were previously able to do. The old ways of creating a progress report campaign excelled at giving our users the ability to either 1) send a campaign for ALL students or 2) single out smaller groups of students with the ability to target individuals. Now, users will have the ability to easily create, and manage, a campaign for large cohorts of students. Here is how it’s done.
How you access your progress report campaigns has not changed a bit. You will still click on the Campaign tab to view any existing campaign as well as create new ones.

Quick Stats/Hide Stats: This option, when clicked, displays the some basic numbers surrounding your campaign.
Date First Sent: The date displayed here will be the date your campaign was sent to your professors, NOT the creation date of the campaign.
Evaluations Sent: The number shown here represents the total number of individual evaluations in your campaign. For instance, if your campaign consists of 5 courses, 25 students in each course, the total evaluations sent would be 125.
Responses from Professors: The value shown here is the total number of evaluations your professors have submitted evaluations for. For instance, if 2 professors have submitted 5 students each, the total responses would be 10
Students Marked At-Risk: This number represents how many students, of the Responses from Professors, have been marked at-risk. For instance, in the example above, 4 of the 10 students evaluated were marked at-risk.
Total Responses: The pie charts represent some interesting numbers. Here is a breakdown.
Responses: This value indicates what percent of total evaluations have been submitted so far. In the example above, a total of 8 responses have been received, out of 124. This accounts for an 6% response rate.
At-Risk: This percent is calculated by how many students have been marked at-risk divided by total responses by professors. So in the example above, it would be 1/8, which translates into 12%.
Creating a new progress report campaign
If you are already familiar with the process of creating a progress report campaign, our changes should seem different, yet still familiar to you. The same information you are used to defining still needs to be created, however in a slightly different fashion. Let’s dig into the details.
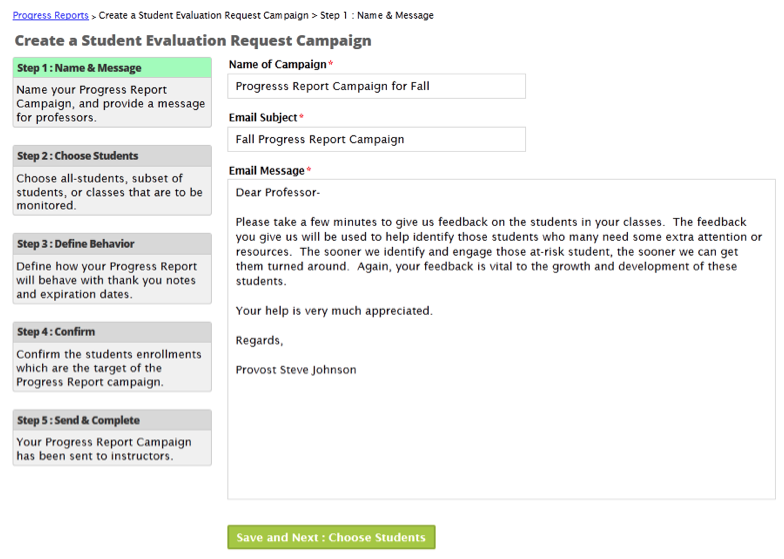
Step 1: Name & Message: The information provided in step 1 goes into naming the campaign, defining the subject of your email, as well as writing your message.
Name of Campaign: This is the name of your campaign and will be visible on the Campaign tab.
Email Subject: This is where you will define the subject of the email your professors will see.
Email Message: Like the subject above, this is where you will define “the message” (the body of your email) you wish to convey to your professors. A brief message, summarizing what you are asking your professors to do, is usually best. It is always a good idea to give your professors a “heads up” notification/email so they know exactly what a progress report is and what your expectations are.
Step 2: Choose Students (courses): Choosing which students/course sections that will be included in your progress report campaign is perhaps the most import step of the creation process. GradesFirst has an incredibly flexible system that allows schools to select specific groups of students or entire cohorts.
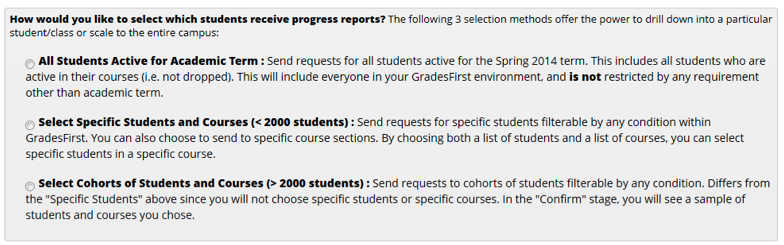
All Students Active for Academic Term. This should be used when sending a PR campaign for all students. This option is best used if you wish to send a campaign to all students that are enrolled in the current term. Please be aware, that large students bodies can certainly take some time to complete. If this option is for you, check and click Next: Define Behavior.
Select Specific Students and Courses (<2000 students). This option should be used when sending a PR campaign for a selective group (or cohort) less than 2000 students. For example, all students on the football team. When you click this option, the bottom half of the page opens up giving you a filter for both students and classes (see below).
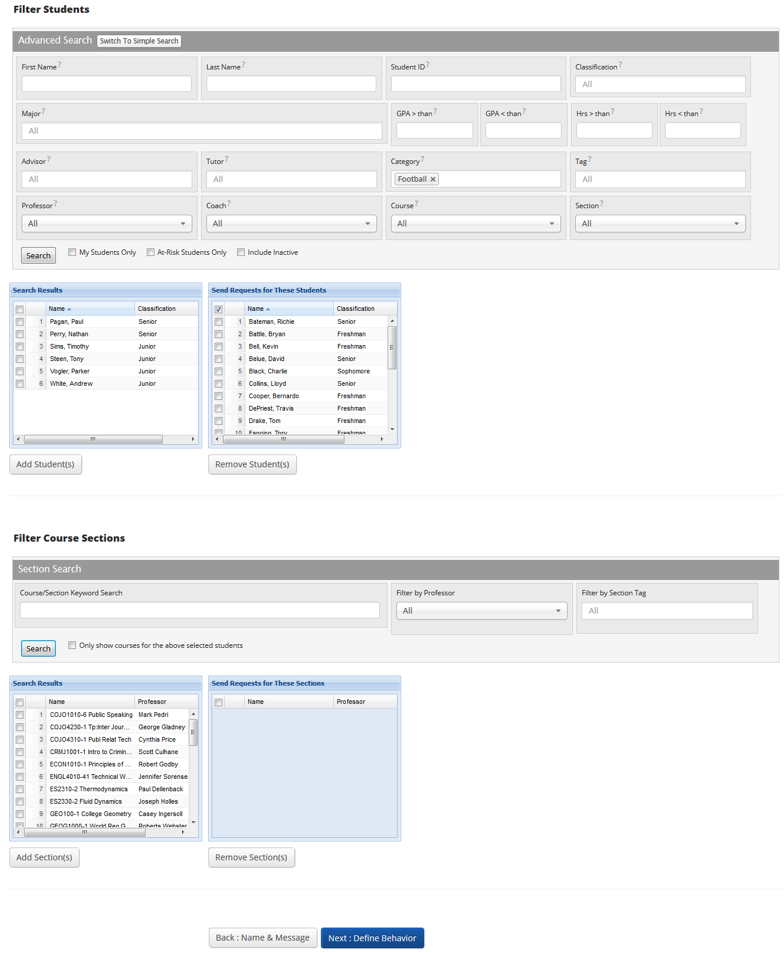
Filter Students
When you click the Advanced Search option, that opens up a plethora of filtering capabilities. Most of those options should be self-explanatory, so we will not go into details covering each one, rather just explain how the filter generally works. In my example above, I chose a Category of ‘Football’ and click Search. I was then presented with a list of all my Football players (in the Search Results list box). I then placed a checkmark besides each student I wanted to include in my campaign and clicked the Add Students button. This physically moved those students over to the Send Requests for these Students list box. If I wanted to add more students, for example maybe the Baseball team, I would remove the Football category, add Baseball and re-click the Search button. I would then select which Baseball players I want to include in my campaign and click the Add Students button. I repeat this search process as many times needed to select all of the students needed for my campaign. Once done, I could use the Next: Define Behavior button to move to the next step.
Filter Course Sections
We do have another filter that you can use either independently of, or in conjunction with, the Student filter. It is the Course Sections filter. If used in conjunction with my already selected Football and Baseball students, I could create a campaign for just specific courses that are taken by my already selected students. For example, I could choose to run my campaign for only Math courses for my Football and Baseball students. I would just need to search for, and select, all the Math courses and then click the Next button.
When using the Course Section filter in conjunction with the Student filter, we have a checkbox option called Only show courses for the above selected students. When checked, this option will only display courses that are currently being taken by your above selected students. Users could then select only Math courses as a quick way of only including math courses, for my Football and Baseball students, in my campaign. This is probably a lot easier than trying to simply search your entire course catalog for all of your Math courses.
OR I could use the Course filter independently of the student filter and simply create a campaign for ANY student in my Math courses. To do this, I do not select ANY students via the student filter and only search for, and select, my Math courses via the Course Section filter.
Once all of your students and courses have been selected, click the Next: Define Behavior button to move to the next step.
Select Cohorts of Students and Courses (>2000 students). This is the third, and last, method of selecting which students should be included in your PR campaign. This option should be used when sending a campaign for a selective group (or cohort) greater than 2000 students. For example, all freshman and sophomores. Checking this option opens up the filters shown below.
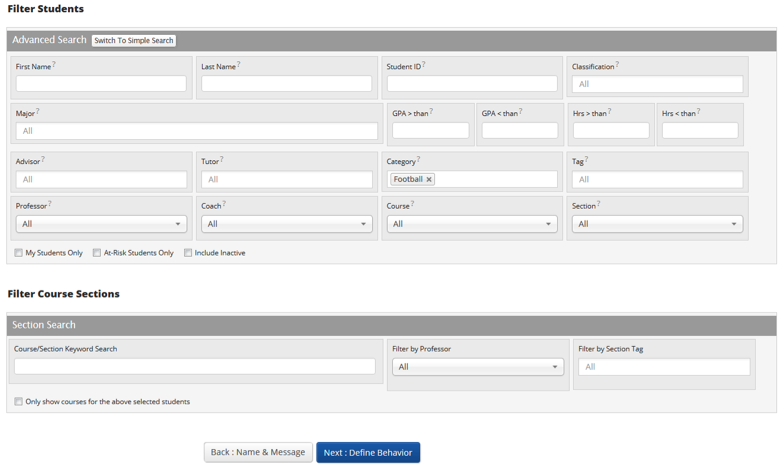
Filter Students. This option works very similar to the (<2000 students above) however there is not a student search in this filter. This option assumes you want to only select groups/cohorts without having to select the individual students. So in my example above, I want to include my entire Football team. I could also add filter options list a GPA > then of 3.5. Coupled with my Football category, this filter would include only those students who are on the Football team with a GPA greater than 3.5.
Another example could be if you added Baseball to your existing filter. So you have the Categories of Football and Baseball along with a GPA > than 3.5. This filter would yield students on the Football OR Baseball team with a GPA greater than 3.5.
Filter Course Sections. Just like the example above, this can be used independently of, or in conjunction with, the Student Filters. And, similar to the Filter Students, you cannot select individual courses with this method. You can only select groups of Courses.
Once all of your students and courses have been selected, click the Next: Define Behavior button to move to the next step.
Step 3: These next options are more administrative in nature. They enable the user to define parameters around this campaign to help prevent professors from being sent multiple campaign emails to when the campaign should expire and lastly, should the professors receive a “Thank you” email when they complete their evaluations.
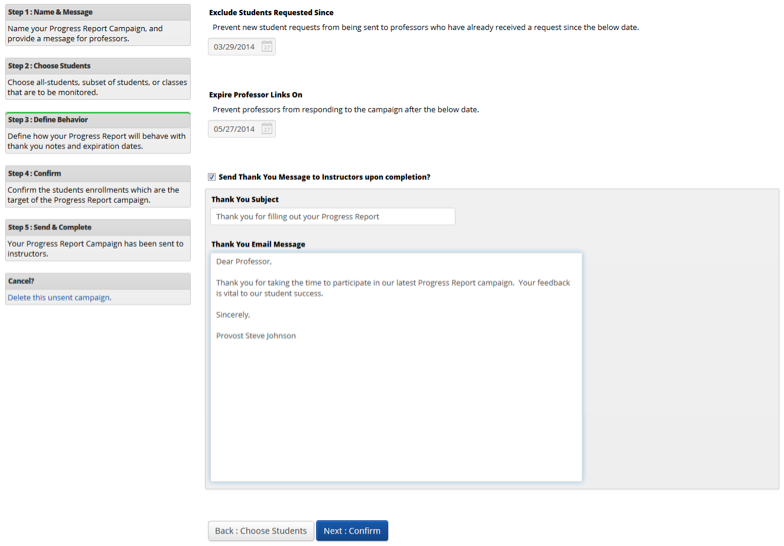
Exclude Students Requested Since: This date is used to ensure duplicate progress report requests are not sent to the same professors for the same students in the event a second campaign is sent. Let me explain further. If a progress report is created and sent on 11/1, and you upload your latest schedule changes on 11/5, therefore adding (and removing) students to classes. With an updated roster in GradesFirst, you may want to send out another PR campaign to ensure those newly added students are also evaluated. The catch is that you do not want the professors to have to re-evaluate all students again. So to prevent this, we have added the ability to exclude those students already evaluated from appearing in this second campaign. All that needs to be done, in this example, is when you create your second campaign, enter the date of 11/1, which tells GradesFirst to exclude the students who have already been evaluated from the professors list.
Expire Professor Links On: This is essentially your progress report campaign expiration date. Simply select the date you wish for any unfiled professor evaluations to expire on. If a professor tries to access the campaign after that date, they will be notified that the “link has expired.”
Send Thank You Message to Instructors upon Completion? Check this box if you wish for GradesFirst to automatically send a “Thank you” email to each professor that completes their evaluations. When checking this box, you will be able to define both the subject and message of the email. And as each professor completes their evaluations, they will automatically receive your thank you email.
Click Next: Confirm to move to the next step.
Step 4: Confirm: This final page will give you a detailed count of how many students, professors and course sections will be included in your campaign. Also, a complete list of your included students will also be displayed.
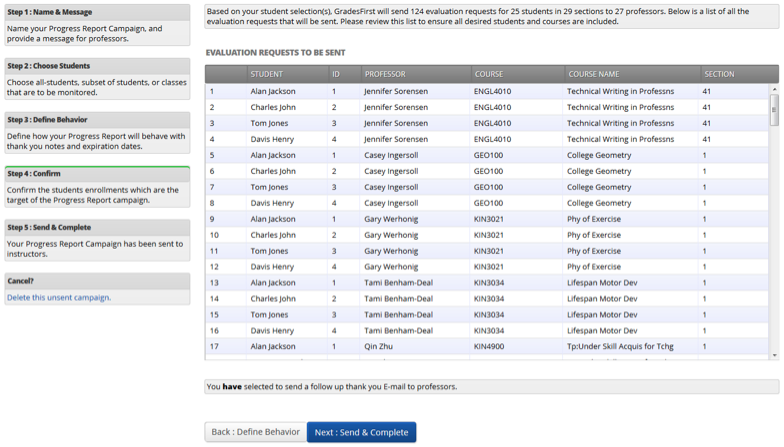
Summary at the top. This above summary will detail exactly how many students, course sections and professor that are included in your campaign. In our example, we have 25 students, 29 sections and 27 professors who will be included. We added this feature so the user creating the campaign would have some idea if the numbers seemed correct before sending.
Evaluation Requests to be Sent. We also added the ability to preview the list of students who are to be included in your campaign.
What happens if I don’t see any students in my list? Depending on how large your campaign is, this grid may populate instantaneously or it may take several hours. But in either case, you will not be able to click ‘Next: Send & Complete’ until your students populate in this grid. If this process takes a while, you do not have to wait on this page while your campaign is being built. You can go off and do other things in GradesFirst and when your list of students is done populating, GradesFirst will let you know with a “Growl” message like the one you see below.
If everything looks good, click the Next: Send & Complete button to complete and send your progress report campaign.
Now that we have covered how to create a progress report campaign, let us now cover how to “manage” or view the details as feedback starts to come in from your professors.
Viewing the Details of your Report Campaign
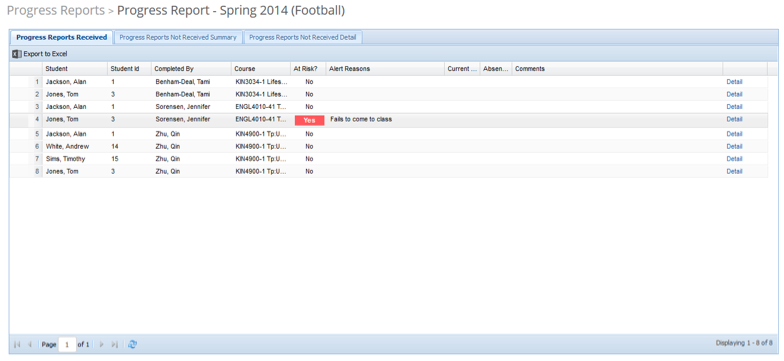
When viewing a progress report campaign’s details, you will see three tabs. The first tab, Progress Reports Received, displays all feedback submitted by professors.
Progress Reports Received
This tab displays all the feedback that has been submitted by your professors. Also, by clicking the ‘Export to Excel’ button, all this data is exported to Excel to allow for data mining, statistic gathering or reporting.
Progress Reports Not Received Summary
The second tab displays all professors who have not responded or finished with your progress report campaign. There is quite a bit of functionality on this page, as these functions will let you manage and track the list of professors who have not yet completed their evaluations. This page is presented to the user in a professor centric perspective.
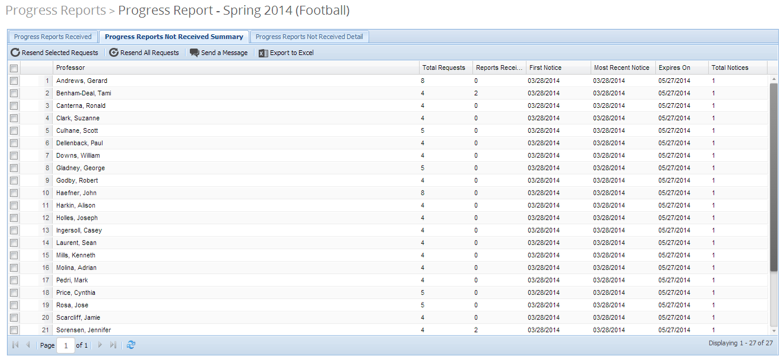
Resend Requests: This option enables you to resend the campaign request email to select professors.
This works well for sending out second (and even third) reminders. It can also be used for those
professors who have lost their original campaign email.
Resend All Requests: Similar to the Resend Requests option this will resend the campaign request emails to professors, but it will do it for all professors (as the name implies).
Send a Message: Use this option to send an email to selected professors.
Export to Excel: Want to view all this information in a nice an easy to read format? Use the ‘Export to
Excel’ option.
Along with the buttons, there are a few columns that probably need to be explained.
Total Requests: This column represents how many total students a professor has been asked to evaluate.
Reports Received: Will display how many students a professor has already evaluated.
Total Notices: Represents how many times you have ‘Resent Requests’ to each professor.
In summary, this is the tab you will use to view, and monitor, which professors still owe you evaluations. You can use this tab to “work” the list of professors by simply sending them an email reminder (Send a Message) to please complete your evaluations or a more formal request (Resend Request) whose email contains an actual link to each professors campaign entry page. Other information displayed on this tab will let you gauge how responsive (or not) your professors have been in completing their evaluations. Lastly, if a professor does not appear on this list, that means they have already completed their progress report campaign.
Progress Reports Not Received Detail
In many ways, this tab works almost exactly like its predecessor (Progress Reports Not Received Summary) with the except that this tab is more of a student centric view. So if you need to see a list of which students have not been evaluated, this is your tab.
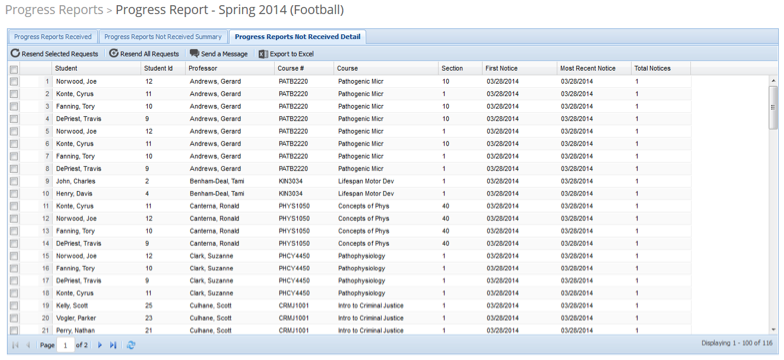
The options on this page are identical to those on the previous tab in name and function. An area of possible confusion can be “Who receives the email when a check a student’s name and click either Resend Requests or Send Message?” In both cases, the professor will receive said email.
Progress Reports Campaign Reports
Need to find out how your professors evaluated your students during a Progress Report campaign, these are your reports. We will break down each report. Users can print progress reports from one of two locations; the Campaign or Reports tab. Both tabs refer to the exact same reports.
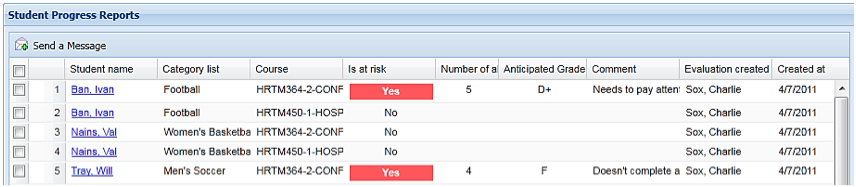
Student Progress Reports. This report, as displayed below will provide you with an overview of your progress reports within the date range you specify. This report will show any and all students who have been evaluated by their professors, depending on your search criteria.
Detailed Student Progress Reports. This report functions the exact same way as the above report, however more detailed information will be displayed with each student.
Students Flagged At-Risk or Critical. This progress report automatically limits the output to ONLY those students who were evaluated as At-Risk during the progress report process. Students who were not evaluated as at-risk will NOT appear on this report. Like every other report in GradesFirst, you can use the Advanced Filter the report on only a select group of students if desired (e.g. Show me all Football players who received an At-Risk evaluation.

Detailed Students Flagged At-Risk or Critical. This report functions the exact same way as the above report, however more detailed information will be displayed with each student.
At-Risk Progress Reports and Tutor Appointment. The following report shows a list of students who have been reported At-Risk in a course and any tutor appointments for that course. This report shows if students who are marked At-Risk are being processed effectively with tutor appointments. Also, with Dropped Dates, Tutor Appointment Dates, and Grades, the report shows effectiveness of those actions. Because of its size, there is not enough room to adequately display a screenshot of the report.

Progress Report Campaign Reports. This report will display all students who were a part of a progress report campaign via a specific date range. Below is an example of what this report will look like.

This concludes the progress reports campaign.
Enrollment Census Campaign
The Enrollment Census campaign will provide information about which students attended class and the date of their last attendance. The information collected here can be very helpful as Administrators seek to compile and quantify your institution’s attendance at the end of a semester or school year.
Creating an enrollment campaign is easy! If you have created a progress report campaign before, this build process is very similar to the progress report campaign.
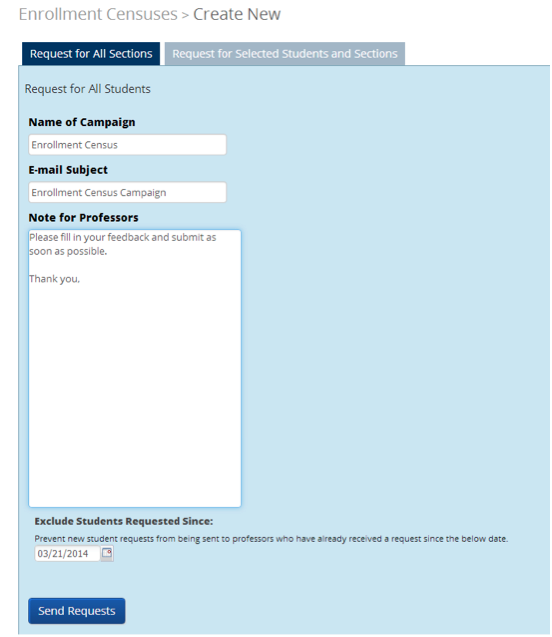
From the Campaign tab> Create New> click on Enrollment Census Campaign, this will open the screen for you to add in the details of your campaign. There are two tabs: Request for All Sections or the Request for Selected Students and Sections.
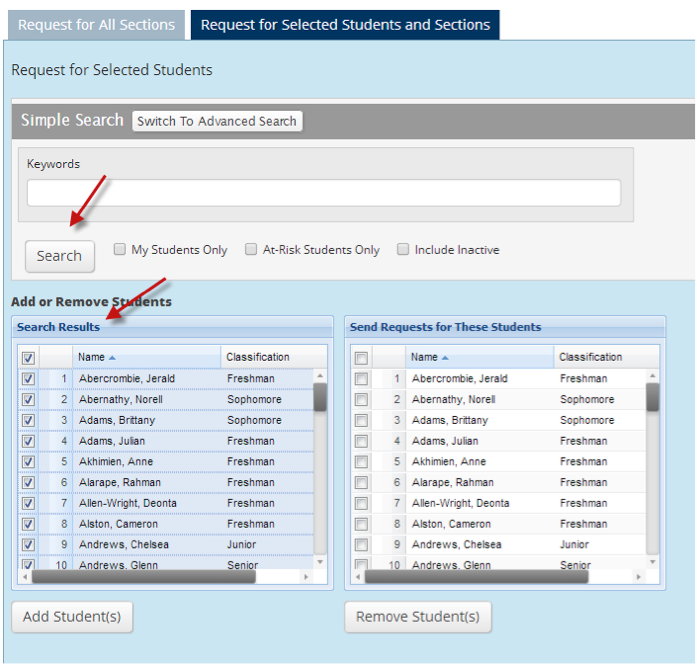
First you will want to search for the students you would like to send the campaign for by using the Advanced search option that includes filters and search criteria, or by simply clicking the Search button. Now, select the students in that list and click Add Students. The students should now be listed on the right.
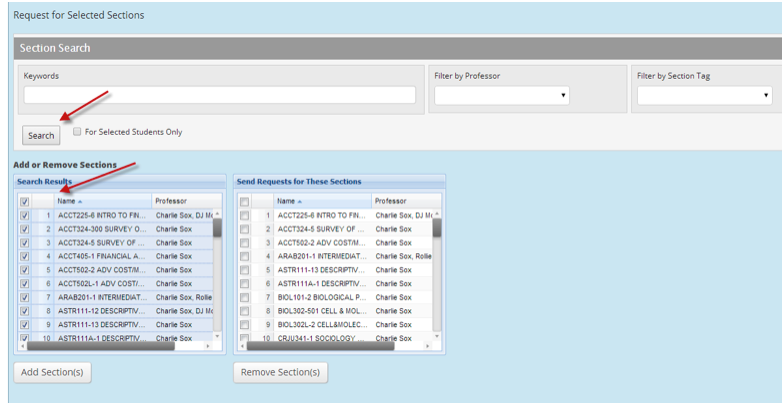
Next, let’s search for the selected sections. Use the Filter by Professor, Filter by Section Tag options. Or click Search and select in the list the sections you would like to add to your campaign. Then click Add Sections. They should now be listed on the right. Once you have completed your campaign details, click Send Requests.
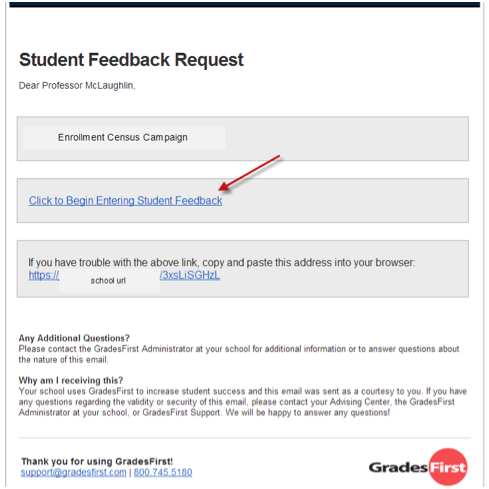
When the campaign is created and sent, the faculty will receive an email very similar to the one you receive for progress reports.
Unlike the Progress Report Campaign, there is no expiration date for the Enrollment Census link.
Below is the form you will see once you have selected “Click to Begin Entering Student Feedback.”
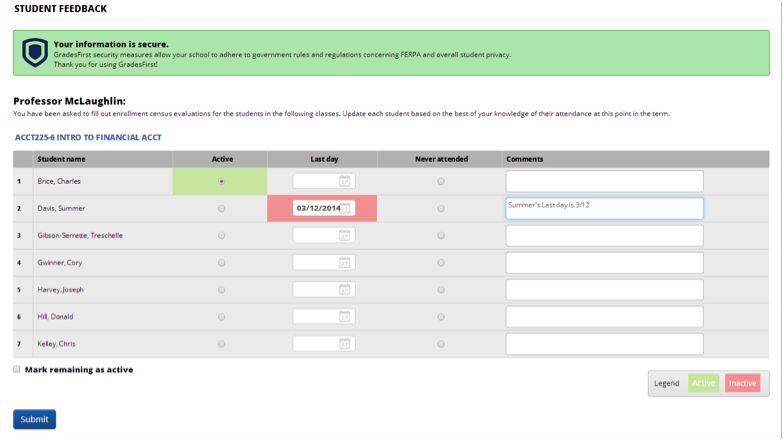
Here you will be able to mark students who are currently attending your class as “Active” and mark any students who have a last day of attendance. For those students who were enrolled in your class but never attended, you will check the Never Attended option and fill in any additional comments. At the bottom of the form you will notice a checkbox Mark remaining as Active, if you select this option the form will automatically fill in the rest of the unmarked students as “active” for you.
Once you are finished, simply click the “submit” button, and you will receive a pop up message letting you know that you have successfully completed your feedback.
At any time you can monitor your campaign by going to the Campaigns tab and clicking on the name of your enrollment census campaign. Doing so will bring up the following tabs:

These tabs provide direct insight responses have received so far and any feedback that has not been received. Giving you options to Resend Requests at the touch of a button, to send a message, or export your data. (See below)

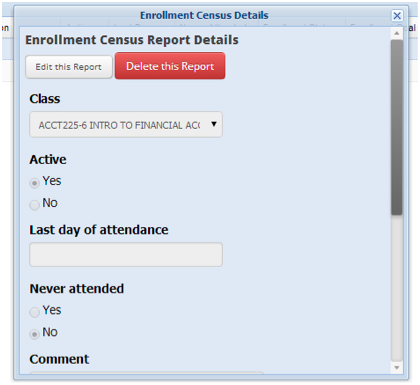
The Details link will allow you to open the details of the feedback and if you have the permission to do so, Edit the Report or Delete the Report entirely if necessary.
Cases
Case Management is a new concept in the GradesFirst early alert process. Cases allow advisors, faculty, and even tutors and other student workers to issue alerts on students for a variety of reasons rather than limiting alerts to strictly academic parameters. This gives a fuller and more accurate picture of a student’s progress and educational well-being by taking into account all aspects of life. Consequently, actions can then be taken both inside and outside of the classroom, resulting in much more effective student support and great student success.
Enabling Cases
In order to begin using Case Management, you must enable cases via the Admin tab>Group Settings>Case settings. See the screenshot below.
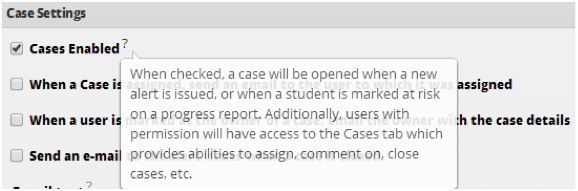
Cases Enabled
When this box is checked, a case will be opened whenever a new alert is issued or when a student is marked at risk on a progress report. Additionally, users with permission will have access to the Cases tab, which provides abilities to assign, comment on, and close cases.
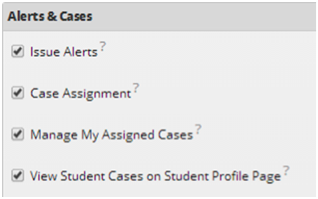
User Permissions
Note that like all user permissions in GradesFirst, permissions may be granted by role or on an individual basis by using the Edit User Settings link on the user’s profile. As shown below, there are several different types of user permissions associated with Case Management. These permissions can be found via the Admin tab>User Roles or by individual user >Edit (the pencil icon)>Alerts&Cases.
- Issue Alerts. This permission allows users to issue alerts.
- Case Assignment. This permission allows users to assign cases or change its owner.
- Manage My Assigned Cases. A user with this permission will be able to add comments or close cases to which they are assigned or own. Note: this permission does not allow a user to assign cases. The Case Assignment permission is required in order to assign or re-assign a case.
- View Student Cases on a Student Profile Page. Users of this permission will be able to view student cases and alerts that have been issued for a particular student. These cases are located on the student profile page, so the user must be able to view student profiles in order to see their cases and alerts.
There are also administrator permissions associated with case management. These permissions can be found via the Admin tab>User Roles>Edit (the pencil icon)>Administration.
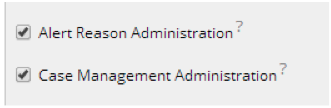
Alert Reason Administration: This permission will most likely be given to Administrators. It allows the user to give other users access to the Alert Reasons link on the Admin tab. (Access to that link will allow the user to create and manage your school’s alert reasons.)
Case Management Administration: This permission will most likely be given to Administrators. It allows the user to administer options and permissions related to alerts and cases. It is the most encompassing Case Management permission.
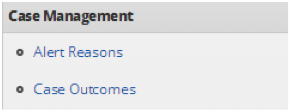
Alert Reasons
If you have permission to create and manage alert reasons, then these reasons can be managed by going to the Admin tab>Alert Reasons. On this screen you can add, edit, or remove an alert reason at any time.
One you have clicked on the Alert Reasons link, you will see a list of any existing Alert Reasons in the system. From this screen we can create new reasons, change reason activation status, auto assign users to cases, and more.

- Name. This column includes all of your existing alert reasons.
- Is Active? This column tells you whether or not an alert reason is currently active. If an alert reason is not active, then it will not be an option for anyone issuing an alert in the system and will not be an option on progress report requests that are sent to faculty.
- Auto Assign Advisor? If this column says “Yes,” then any time this specific alert is issued on a student, the student’s assigned advisor(s) will automatically be assigned to the case (giving them the ability to make comments, close the case, etc.).
- Auto Assigned Users. This column tells you if any other specific users have been assigned to the case. If so, the name(s) will appear here.
- Actions. Use these buttons to edit or delete an existing alert reason.
- Add New. Use this button to add a new alert reason. When you click the Add New button, you will be prompted to name, activate, and assign the case on the next screen. See below.
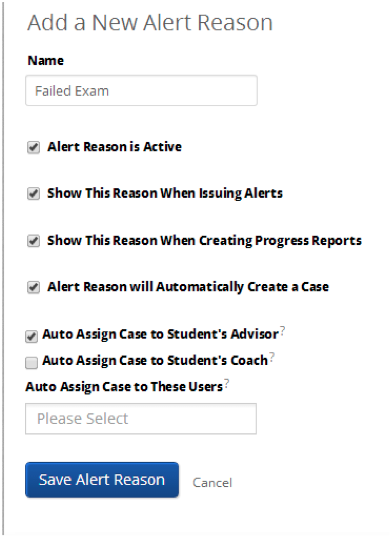
- Name. You will want to make sure that the name of the alert reason clearly states the issue the student is having. In the above example, this issue is being alerted because the student has Failed Exams.
- Alert Reason is Active. The alert reason needs to be in active status in order to use throughout the application.
- Show This Reason When Issuing Alerts.You can select to show this reason when you are issuing alerts.
- Show This Reason When Creating Progress Reports. You can select to show this reason when a progress report is created.
- Alert Reason will Automatically Create a Case. If this is selected, when this alert reason is chosen when issuing an alert a case will automatically be created.
- Auto Assign Case to Student’s Advisor? For students with more than one advisor, the case will be assigned to each advisor.
- Auto Assign Case to Student’s Coach? The case will be assigned to each coach.
- Auto Assign Case to These Users? The case will be assigned to each specified user.
Case Outcomes
If you have permission to create and manage alert reasons, then you also have permission to create and manage case outcomes. A case outcome is chosen whenever a case is closed – it will essentially explain why the case is being closed. These outcomes can be managed by going to the Admin tab>Case Outcomes. On this screen you can add, edit, or remove case outcomes at any time.
Once you have clicked on the Case Outcomes link, you will see a list of any existing Case Outcomes in the system. From this screen you can create new outcomes, change outcome activation status, and edit or delete case outcomes.

- Name. This column includes all of your existing case outcomes.
- Is Active? This column tells you whether or not an outcome is currently active. If an outcome is not active, then it will not be an option for anyone closing a case in the system.
- Actions. Use these buttons to edit or delete an existing case outcome.
- Add New. Use this button to add a new alert reason. When you click the Add New button, you will be prompted to name and activate an outcome on the next screen. See below.
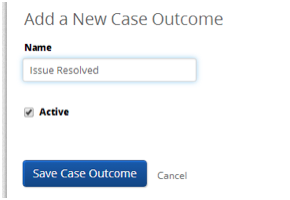
That’s it! Now anyone with the Issue Alert permission will be able to issue an alert on a student and/or view and close open cases.
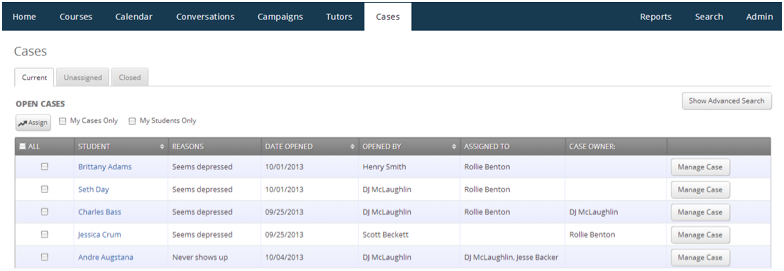
Cases Tab
In the image below, you can see that you now have an additional tab on your home page labeled Cases. This tab includes another group of tabs – Current, Unassigned, Closed all of which allow for different case management options.
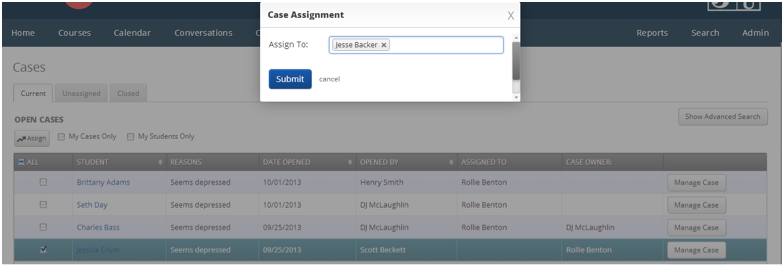
Assign button
Use this button to assign users to unassigned cases or as an additional assignee to a case that already has one or more users assigned to it.
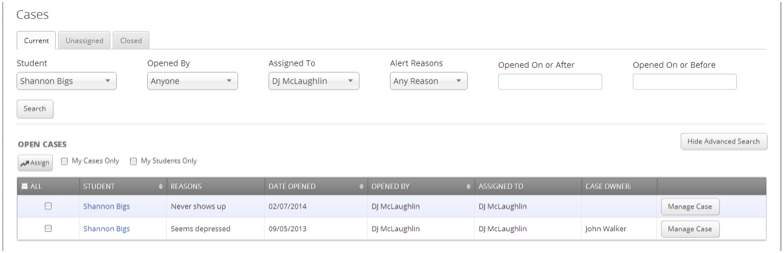
Show Advanced Search
You can use the advanced search option to filter which cases you would like to view on the page. There are several options, including filtering by a date range, just viewing cases for your assigned students, and more.
Current tab
On this tab you have a list of all the current cases which are still open, regardless of whether or not the case has been assigned to anyone.
- Student. This is the student for whom the alert was issued.
- Reasons. This is the alert reason that was chosen when the alert was issued.
- Date Opened. This column tells you the date the case was opened (i.e., the date the original alert was issued).
- Opened By. This is the user who opened the case (i.e., issued the original alert). This user may be different than the owner of the case
- Assigned To. This is a list of all users who are assigned to this case.
- Case Owner. This is the owner of the case. This user may be different the user who originally opened the case.
- Manage Case. This button allows you to manage (edit) the case. When you click on this button, you will have several options regarding the details of the case. See below.
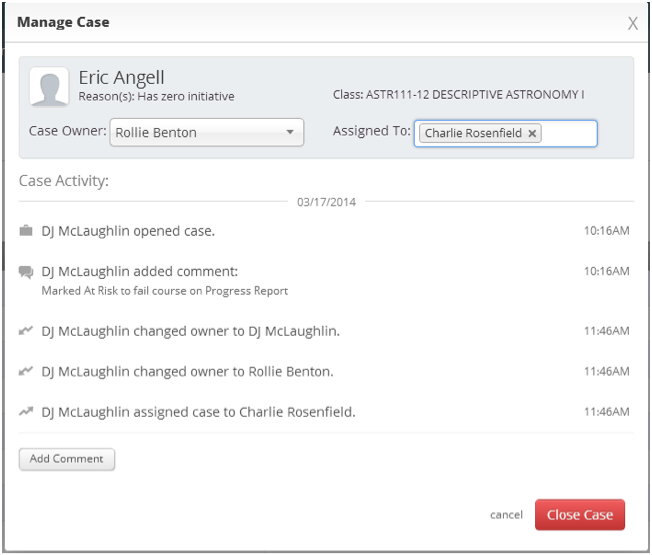
Note that any changes you make to the case will be automatically saved, and a confirmation banner will appear at the top of the screen.
Unassigned tab
On this tab you have a list of all current cases which are still open and have no users assigned. It includes all of the same columns as the Current tab with the exception of the “Assigned to” column. You can use the Assign button or the Manage button to assign users to cases on this tab.
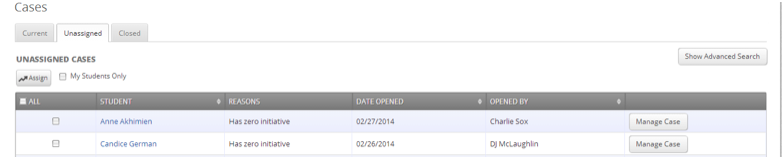
Closed tab
On this tab, you have a list of all closed cases in the system. You are given all of the information that is given on the current tab but with two additional columns – Date Closed and Closed By.
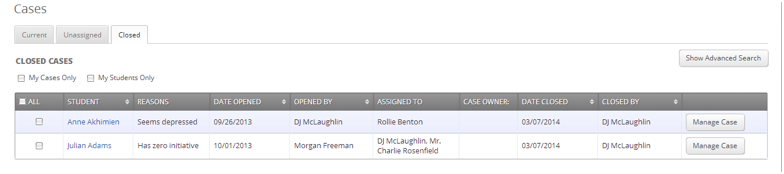
- Date Closed. This is the date the case was originally closed (i.e., the alert was issued).
- Closed By. This is the user who closed the case.
When you manage a closed case (or view its details) you will be able to see the Case Outcome (i.e., why the case was closed).
Viewing Cases on a Student’s Profile
To view cases on a specific student’s profile, simply navigate to the student’s profile, and select the Reports/Notes tab. Here you will see that we have added a section for both open and closed cases, which you can navigate between using the appropriate buttons.
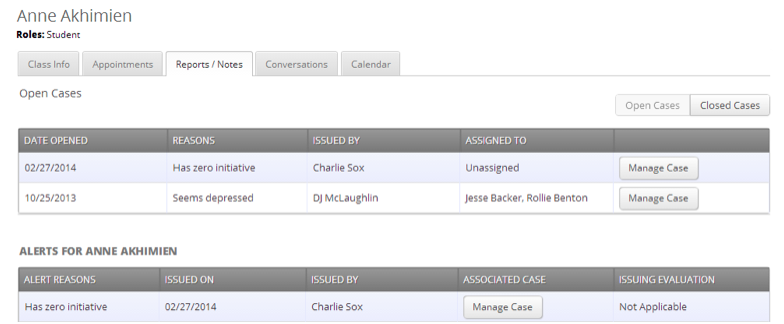
Issuing an Alert
As an Advisor, Tutor, or other Non-Faculty User
There are two ways you can issue alert for a student as a non-faculty member – issuing an alert from your homepage and / or issuing an alert from the student’s profile.
Issue an Alert from Your Homepage
To issue an alert from your own homepage, begin by selecting the large Issue Alert button on the right hand side of the page.
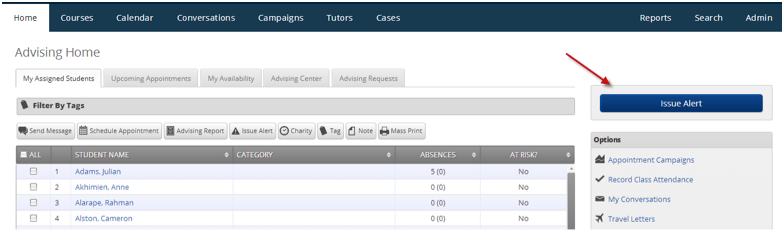
Once you’ve clicked this button, a new window will appear with options to search for a student, choose the appropriate alert reason(s), add a specific class to the alert, and provide additional comments.
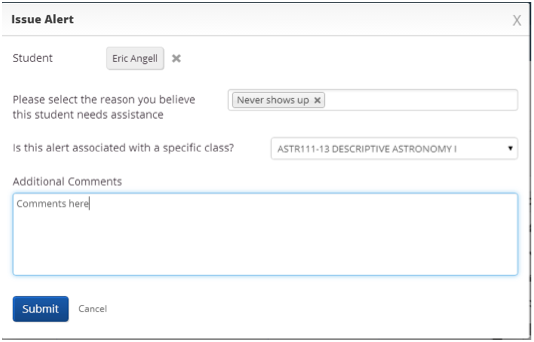
Student. This search field functions the same way the Quick Search function does. This means that a user with permission to issue an alert may search for any student without necessarily having permission to view his or her student profile.
Please select…: This is where you will choose the alert reason(s) for the appointment. Simply start typing a reason or click in the field for the list of active Alert Reasons to appear.
Is this alert associated…? (Optional): If the alert concerns a specific class, you can use this drop down menu to choose the class. It is automatically populated with the student’s current courses.
Additional Comments. This is where you should enter any comments associated with the alert.
Issue an Alert from a Student’s Profile
The second way you can issue an alert for a student is from the student’s profile. Simply navigate to the student’s profile page and select the Issue Alert link on the right hand side of the page in the Options box.
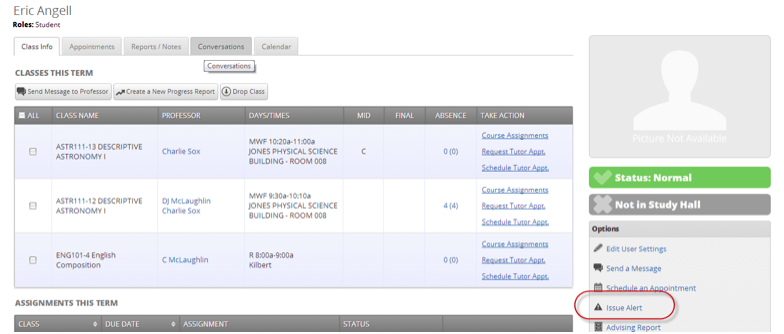
Once you’ve clicked this link, the same window will appear that you see when issuing an alert from your own homepage. The only difference is that the student will automatically be filled in as oppose to having the option to search for any student.
As a Faculty Member (via a progress report request)
Faculty members will fill out progress reports in essentially the same way, however there will be one additional column in the progress report request that will require them to choose an alert reason if marking a student at-risk. Below is what the new progress report request will look like.
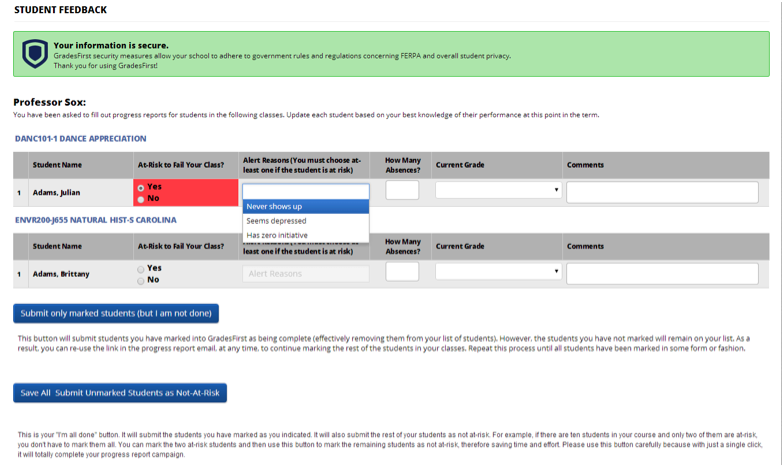
Closing Cases
To close a case, you will navigate back to the Cases tab>Current tab. From there you will choose the Manage button of the case you want to close.
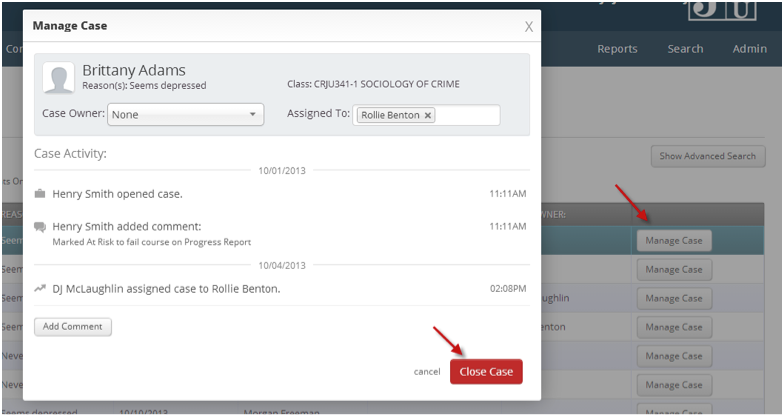
Once you’ve clicked the Manage button, you will scroll down to the bottom of the case information and choose the Close Case button.
Next you will need to choose a Case Outcome. The drop down box will include any active Case Outcomes that have been created for your school via the Admin tab. Once you choose an outcome and select Submit, the case will officially be closed.
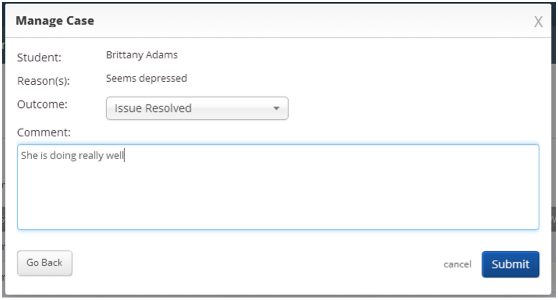

Search
The Search page offers users a great way to search for a specific group of users (e.g. students, professors, advisors) and then optionally perform some action for them. For instance, it is possible to get a list of all Men’s Baseball players with less than a 2.0 cumulative GPA and send them an email. You may also use this functionality to locate and edit a user’s account.
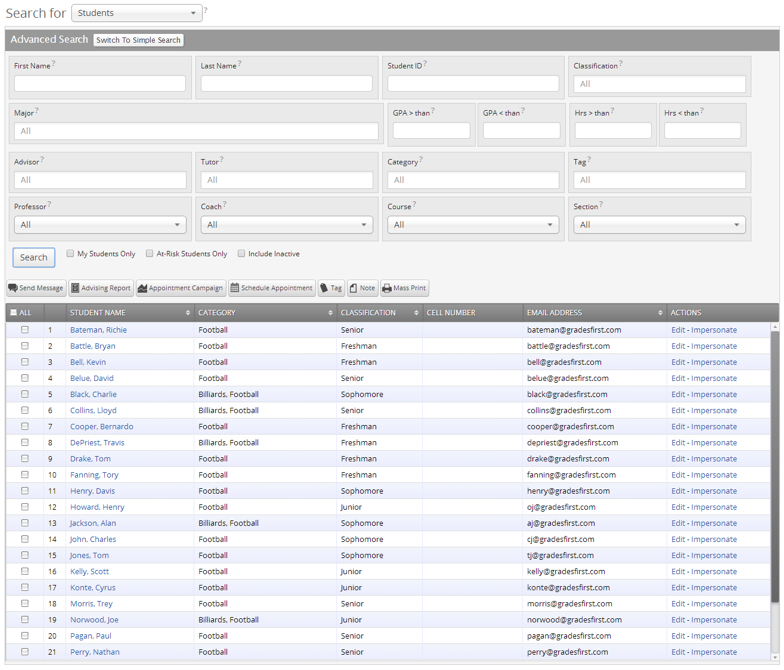
Search For. This option will let you focus your search for Students, Tutors, Study Hall Monitors, Professors, Advisors, Coaches, Administrators, Super Users or All Users.
Advanced Search. You can toggle between the Advanced and Simple search by clicking the either link under the Search for Students heading. When you first click on the Search tab, GradesFirst defaults to the Simple Search. With the simple search, you only have the option to search by Keyword. This search will enable the search to search a specific character (or group of characters in the users name), classification and/or category.The Advanced Search, as shown above, gives users a chance to search for a wide variety of other options such as First Name, Last Name, Cum. GPA less than, and many more. Once you have entered your search criteria, click the Search button.
Additional Filter. When you search for students, you will have an additional option in which to further narrow your search results. This option(s) will enable you to search only for ‘My Students Only’, ‘At-Risk Students Only’ and to ‘Include Inactive’ users as well.
Additional Options. Viewing the search results you can them optionally select to Send a Message, add an Advising Report, start an Appointment Campaign, Schedule Appointment, Tag, or Mass Print for those users you have both searched for AND selected.