Users with relevant permissions can enter classroom attendance in GradesFirst.
To access the Attendance Tracking screen, click the Record Class Attendance link in the Options menu on the right side of your home page.
To take attendance, first locate the course for which attendance is to be taken. You can use the Filter Course, Location, Professor field to automatically narrow down the search grid. For instance, if you wish to look for only those courses offered in Saban Hall, simply type in “Saban” in the filter and press <enter>. The search grid will then automatically narrow down the results and only show you those courses offered in Saban Hall.

You can also narrow the search results down to only classes going on right now by checking the Classes in Progress checkbox.
Once you find the course and section, click the Record Absences link. The system will then display the Record Absences screen.
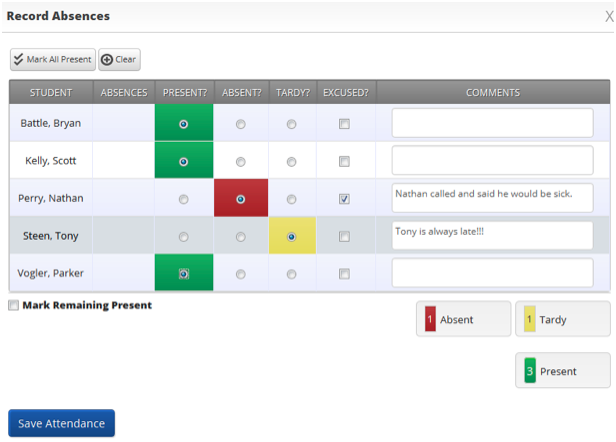
Mark each student Present, Absent, or Tardy. Designate an absence as excused by checking the checkbox in the Excused? column. Comments can also be entered on a per student, per incident basis. Then, click Save Attendance.
With the above attendance screen, you have many attendance options.
A) Mark All Students as Present – This feature allows professors to mark all students as present rather than indicating attendance for each individual.
B) Toggle Patten / Comment – This button allows the professor to change between viewing student attendance patterns and a blank field in which to record comments about the student and his or her absence.
C) Add Progress Report – When this link is selected, a box will appear allowing the professor to submit a progress report for that particular student identifying them at risk. Previous progress reports will also be shown.
D) Mark Remaining Present – This check box allows professors to mark all remaining students as “Present.”
E) To Excel – This link exports all of the classes recorded attendance to Excel, allowing for quick and easy manipulation, printing, saving, etc.
F) Census – This link will direct you to a page where you can fill out the last day of attendance for those students who are no longer active in your course. This is commonly referred to as an Attendance Audit or Course Census. Click the “Show all” link to gain the ability to enter a student’s Last Day of Attendance or mark them as a No-Show.
Note adding a Last Day of Attendance will no longer allow you to take attendance for a student.
Also, clicking the number of absences (the total number of absences is the number outside of the parentheses- the number of unexcused absences is the number on the inside of the parentheses) will generate a list view of all those student’s absences.
You can also select “Detailed View” to get more details about each of the absences for a student.