Advising Center
GradesFirst Advising Center allows your student support staff to assist students who need to check in for an appointment, drop in to see an advisor, schedule a future appointment, or cancel an appointment. From Advising center, you can add students to waiting lists to meet with a specific advisor or the first available advisor. You can also schedule appointments with their assigned advisor or someone else. Advisors can monitor activity within the Advising Center and receive notifications when students are checked in.
Getting Started
To start Advising Center Mode, follow these two simple steps. After logging into GradesFirst, your Home page will appear. In the bottom right hand corner of your screen you will notice a link named “Advising Center”. Simply click the Advising Center link.
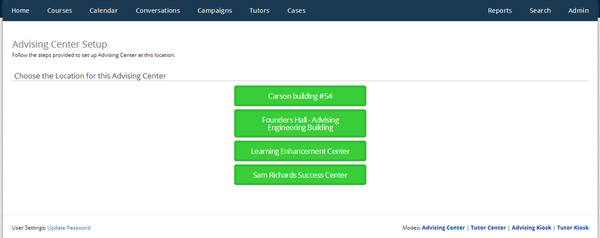
The Advising Center Setup page will ask you to Choose the Location for this Advising Center. Locations are created by the GradesFirst Administrators at your school.
Once a location is selected, you will be taken to the Advising Center scheduling screen. Here is where you can create appointments, add students to a waiting list, check students in for their appointments and much more!
Overview
Areas of Interest
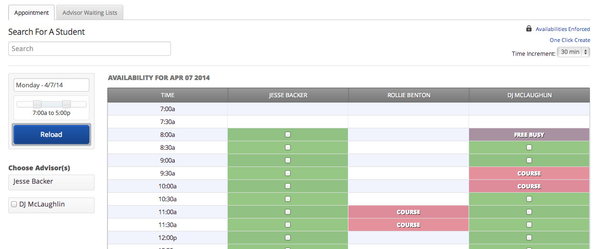
- Search for a Student: Search for your student by First or Last name, Student ID number or email address.
- Date: Select a day from the calendar.
- Time Slider: Adjust the time slider to narrow and refine your search. The Advisor's defined availabilities will be displayed in the scheduling grid, based upon their individual Advisor Settings.
- Reload: Anytime you make changes to the date, time etc. Click the “Reload” button to refresh and reload the page.
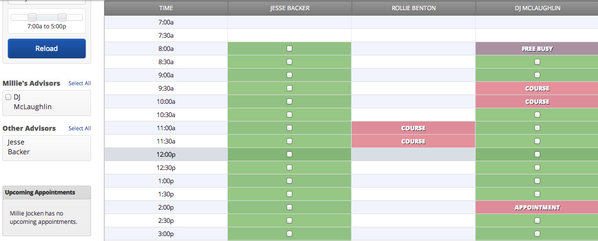
- ChooseAdvisor(s): Select the student’s advisor or a First Available advisor. (Once you have searched for a student, the advisors will populate by category e.g. Eric’s advisors, First Available, Other Advisors)
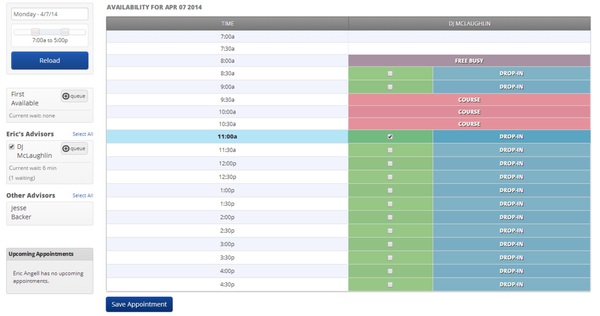
- Scheduling Grid: You will notice a color legend on the scheduling grid. There are color blocks which indicate certain conflicts e.g. student’s course times, appointments or free busy times. Click the title "link" to view details of an appointment or course. You will notice the "green" open blocks indicate available times for scheduling.
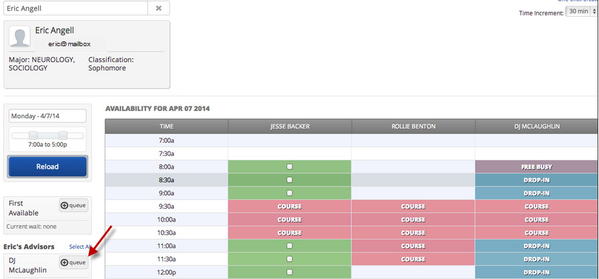
- Wait Times: When a student is placed in an advisor’s queue (waiting list) a Current wait time and the number of those waiting in that queue will be displayed next to the advisors name and will update as they enter or leave the queue.
Adding a student to a waiting list
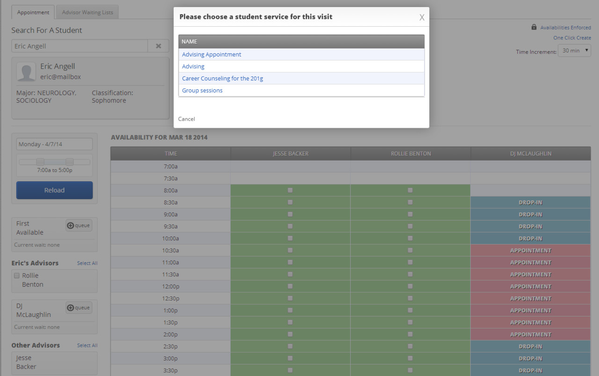
Search for a student and click the "queue" button next to the advisor you choose.
After clicking the “queue” button you are asked to “Please choose a student service for this visit.”
Once you select the service, the student is added to the advisor's waiting list.
Advisor Waiting Lists
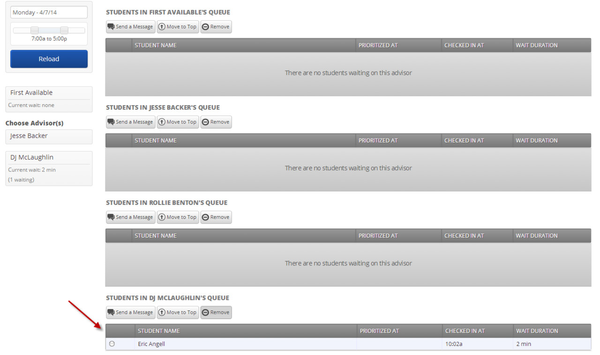
The Advisor Waiting Lists tab includes a list of the students that are currently in the queue for First Available, In Other Advisors queue and your own.
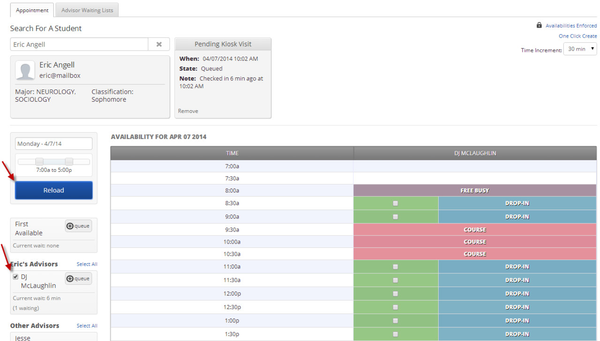
When a student is added to a queue, a notification will appear in the upper right hand corner to notify you they have been added to the waiting list. In addition, you will notice a new Pending Kiosk visit box next to the search field which will allow you to remove the student from the queue if necessary and also includes details of the current visit(s). The First Available waiting list and each advisors waiting lists also include options such as: Remove a student, Move to top (arrange them in priority) and Send a Message.
- Send a message: By selecting the radio button by the students name and then clicking Send a Message you can communicate with a student quickly via email or text (if enabled by your administrator).
- Move to Top: Using this button will allow you to select a radio button by a student’s name and then click Move to top (to prioritize) students in the list.
- Remove Student: To remove a student from the list, simply select a radio button by a student’s name and click the Remove Student button. You may also remove a student by navigating to the Pending Kiosk Visit box and clicking the Remove link.
Availabilities and Scheduling an Appointment
First, search for the student. After you have selected that student, the student's major and classification box appears just below the Search For A Student field, then select the advisor with whom you would like to schedule the appointment with. To narrow your results on the grid, you can select the checkbox next to the advisors name and click “Reload”. This will show you only that advisor and no others. Just remember to click the Reload button at any time to refresh the page.
There might be some instances when an appointment may need to be scheduled outside of an advisor’s normal hours. To schedule outside of an advisor’s availabilities, simply click the Availabilities Enforced link (top right hand of the page) you will notice the availabilities then become ignored. You will then be able to schedule appointments for any time slot.
Methods of saving your appointment
There are two convenient ways to save an appointment once you have selected a student and decided on an available time: One-Click Create and Using Save Button.
One-Click Create
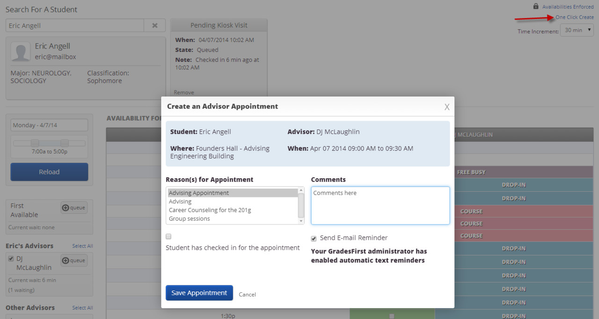
This option is best used if the default time increment for appointments will be used. To enable One-Click Create, be sure you see the One-Click Create link at top right. This tells you that you are in One-Click Create mode, upon clicking on a time slot on the grid, an appointment form will appear. This allows you to quickly review the details of the appointment.
Once you add your detail and click save appointment, you will notice a small pop up notification appears in the top right of the page letting you know the appointment has been created. A confirmation email will be sent to the attendees of the appointment.
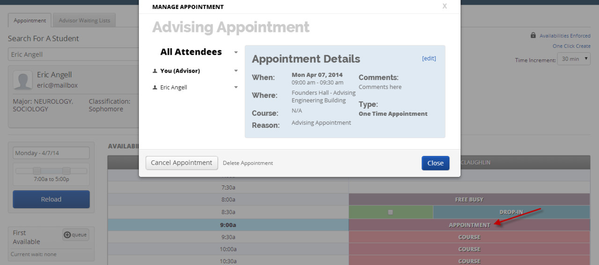
Clicking on the name "appointment" link, will allow you to review the details of the appointment you created. Reviewing the details provides you options such as: Check in a student, Cancel Appointment, Delete Appointment, Send a Reminder, Message attendees and Edit an appointment.
Note: Depending upon how your administrator has set your permissions will determine if you see some or all of these options.
Using Save button
This option is best used if you would like to schedule an appointment outside of the default time increments. Clicking on the link in the top right One-Click Create will change the setting to "Using Save Button" which will allow you to select multiple time boxes of availability e.g. if you have an appointment lasting for two 30 min time slots. After you have made your selections, click the Save Appointment button to create your appointment. This will generate pop up notifications and a confirmation email will be sent to the attendees of the appointment.
Checking a Student in for an appointment
Once a student has been scheduled for an appointment, you can “check that student in” which will send a notification to the advisor(s).
There are a couple of scenarios when checking a student in. For example, if you did not select “the student has checked in for the appointment” box back on the confirmation page when the initial appointment was created, you will now have the option to go back to the search box and search for the student to check them in. This is typically used when a student has previously scheduled an appointment and will check in at a later date/time.
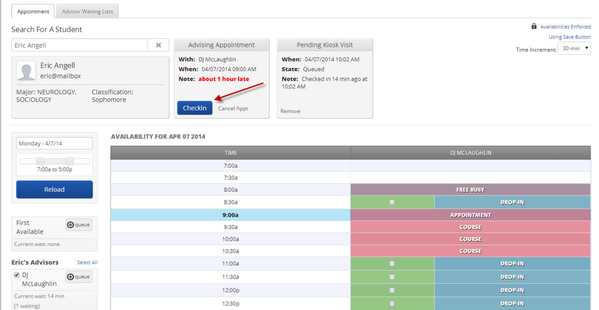
Checking a student in for an appointment is very simple. Search for and find the student by using the “Search for a Student” field. When the student is found, the student information box will appear. If the student has an upcoming appointment scheduled, you will see those appointments or pending visits with a “check in” button. GradesFirst will also display how many minutes early or late the student might be for their scheduled appointment.
If you previously selected “the student has checked in for the appointment” check box in the initial appointment creation, the student will automatically be checked in and the advisor will receive the selected notifications. Notice: the Pending Kiosk Visit Note in the above screenshot.
Creating a User that is not in the system
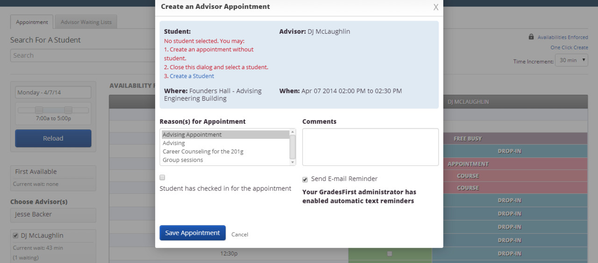
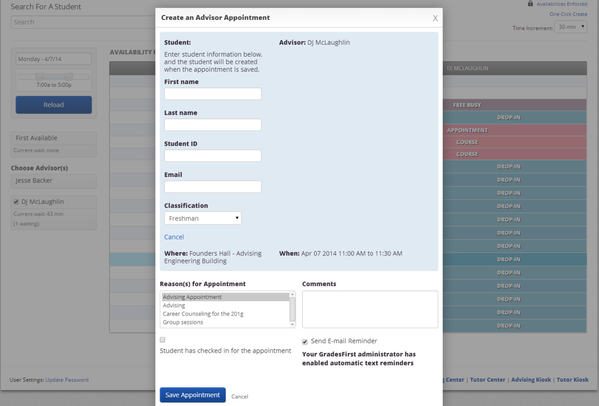
On occasion, while searching for a student you might not be able to locate a student within GradesFirst. Creating an advising appointment for a student who is not in the system is simple. Begin by selecting an advisor and availability based on a date and time. A Create an Advisor Appointment dialog will appear. From there, click the “create a student” link. Upon clicking the link, a longer form will display. Complete the requested information based on your school’s defined naming convention. The Student ID and Email are very important. GradesFirst requires each student ID to be unique, and the Email address is the primary form of communication for GradesFirst notifications.
Save your appointment.
Note: (If you do not have the permissions to create a new user, you may not see the Create a Student link).

