Travel Letters
- Daniel Rehner
- Joy McLaughlin (Unlicensed)
Introduction
Travel Letters within GradesFirst are based on the premise that due to an activity, students are going to miss one or more of the following: Courses, Appointments and/or Assignments. Travel Letters will help you notify the students on the courses, appointments and assignments they will miss as a result of traveling. Also, it will let professors know which students will miss their courses. Good uses of Travel Letters are sporting events, on campus mentoring groups and/or student government trips or meetings. Creating a new travel letter is easy.
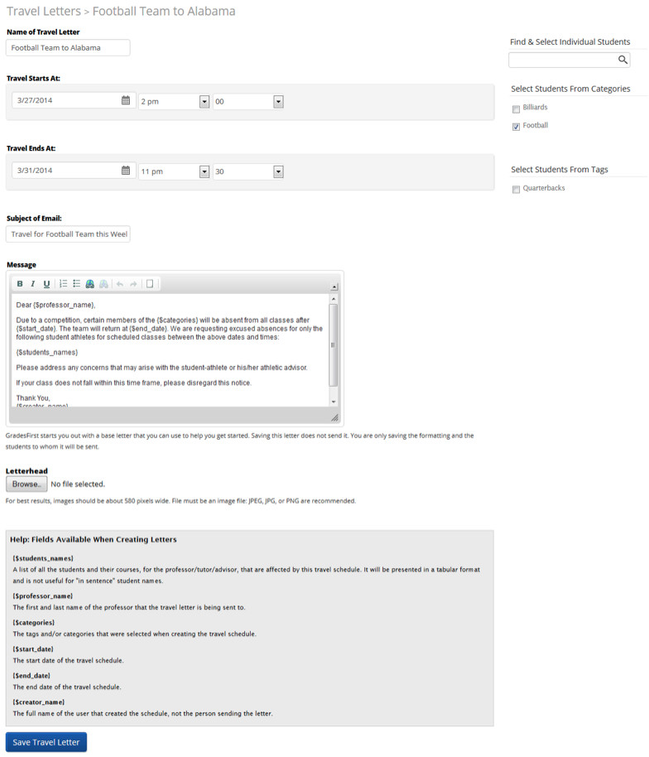
Name of Travel Letter: Enter the name of your travel letter. This name only appears on the main travel letters page and therefore will not be seen by students or faculty members. So feel free to “name” the travel letter something that makes sense to you or your advisors. An example of a valid name could be something like “Football Championship 2011”. Note the "Name of the Travel Letter" also shows on attendance reports for absences created by a travel letter.
Activity Starts/Ends: Define the start/end date and time around your travel letter. GradesFirst will use these dates and times to determine which appointments, courses and assignments students will miss. It is therefore very important to ensure these dates are correct.
Subject of E-mail: As the name implies, the subject will appear as the subject line of the E-mail sent to your professors. Given its importance, and the fact that it will be seen by your professors, great consideration should be taken when defining this. An example of a subject could be “Please excuse the football team for the Football Championship 2011.”
Message: The message is where you can provide details, about the activity, that will appear in both the E-mails and letters sent to your professors and students. By default, the letter contains a message along with specific merge fields to help you personalize the content your professors will see. We offer up the following fields for you to use:
- Professor names
- Start and end dates (and times)
- Student names
- Creator’s name (the person who created the travel letter)
- Categories (this field is not currently in the letter, but is available for you to use if desired)
Select Students: Use the Categories and/or Tags to define exactly which student will be included in this travel letter.
Letterhead: This option allows you to browse out to a file on your desktop and add it to the Current Letterhead field. Once this is done, you will be able to print your letters on school letterhead for distributing.
After defining your travel letter, click ‘Save Travel Letter’ to save. Upon saving, GradesFirst will immediately start to “process” your letter. This process may take a few minutes to complete, so don’t be alarmed if, when you click on the Students tab, you don’t yet see any students. Students will appear when the process completes.
Students Tab
What do I do now? Well, good question. The answer is rather simple; you won’t need to do anything until just before the start date of the activity. For instance, in the example below, my football team will be going to play football at Alabama. So my travel letter will ask the professors to excuse my athletes starting on 3/27 at 2:00 pm and ending on 3/31 at 11:30 pm.
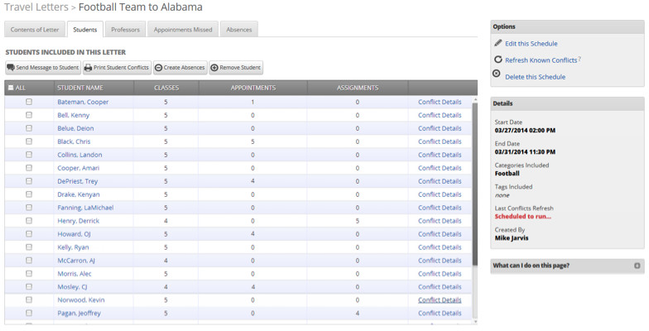
At the time you create your travel letter, GradesFirst will look for existing events (e.g. student appointments, courses and assignments) to determine what your students will miss. It is important to note that GradesFirst will NOT look for scheduled events again until you manually run ‘Refresh known Conflicts’. In other words, your list of appointments, courses and assignments students will miss will only be as current as your last known “refresh”.
For instance, in the example above when I created this travel letter on 3/27/2014 for my football players and clicked save, GradesFirst recorded the courses, appointments and assignments that students will miss during the Football trip to Alabama. Please keep in mind, GradesFirst will only record those courses, appointments and assignments that were in GradesFirst at the time I created the travel letter. So if I were to add appointments, assignments, or schedule changes AFTER I created the travel letter, the ‘Refresh known Conflicts’ should be used to add those missed events to the travel letter.
A Best Practice would be to run the "Refresh known Conflict" on the day that you want to send the E-mails or print the letters for professors. This will ensure that GradesFirst includes any new appointments, courses and assignments that have been added to the student’s schedule since the creation of the travel letter.
Other things that you can do while on the student tab include ‘Send Message to Student’ and ‘Print Student Conflicts’. You can also choose to view ‘Conflict Details’ if you would rather see what a student will miss onscreen.
Both the ‘Conflict Details’ and ‘Print Student Conflicts’ will show the user the same information, but different ways. The ‘Conflict Details’ link will give the user a quick view of events the student will miss during the scheduled events while the ‘Print Student Conflicts’ link gives the user the ability to send those missed events to the printer.
You can now also create course absences for those courses that will be missed by your students. While this is not a required step, it is recommended for those institutions who are taking classroom attendance. Simply select which students you wish to mark absent, click the Create Absences button and let GradesFirst do the rest. This process can take some time depending on the number of students and courses being missed. To see the end result of this process, click the Absences tab and GradesFirst will display for you each missed course for each student.
Professors Tab
Much like on the Student Tab, the user has many of the same options available to them with the exception that this tab focuses on corresponding with professors instead of students. This is where you will keep your professors informed as to which students will miss which courses.
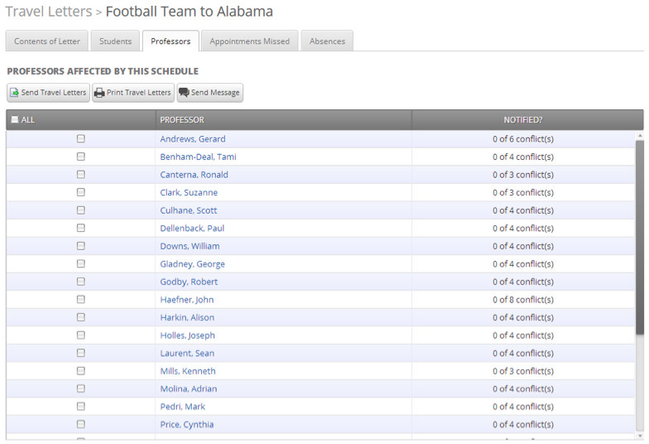
Important Note: As previously suggested, it is imperative that before you print or send travel Letters to your professors that you run ‘Refresh known Conflicts’
After the ‘Refresh known Conflicts’ has been run, you are now ready to correspond with your professors to let them know which students are going to miss their classes. Options available to you on this tab are:
Send Travel Letters – This will send a travel letter E-mail, along with a list of the professor’s classes and students that will be missed during the travel letter’s time period. In other words, everything a professor will need to know to excuse your students during the event.
Print Travel Letters – This will display a report, onscreen, that you may send directly to the printer. Use this for a hardcopy that you can hand to your professors if E-mail is not your desired way of correspondence.
Send Message – Want to send an E-mail to your professor(s), this method is for you. This option will let you send a custom E-mail to your selected professors.
Appointments Missed Tab
This tab will be used to correspond with your Advisors, Tutors or students for appointments they will miss during the scheduled activity. Please see the screenshot below to outline what options are available to you.
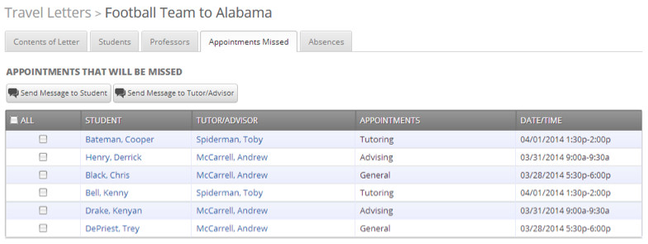
Consider this tab as a means to simply contact or communicate with students, tutors or advisors who will be affected by this travel letter. For instance, in the screenshot above, GradesFirst will display all appointments that will be missed during the Football trip to Alabama.
Again, please keep in mind that if appointments have been created since the creation of this travel letter, please use the ‘Refresh known Conflicts’ link to make sure those are included on this tab.
Absences Tab
The Absences tab is especially important for those that mark attendance in GradesFirst. This tab will be used to ‘Create Absences’ for students and manage those absences based on an activity. To mark a student absent, simply go to the Students tab. From here, you can select the students that apply and click the ‘Create Absences’ button.
Note: Creating absences may take a few minutes to fully complete, so do not be surprise if the Absences tab is still blank immediately after starting the process.

To Delete an Absence for a student you will simply check the box associated with that student and then click ‘Delete Absence’.