Tutor Settings Tab
- Daniel Rehner
- Joy McLaughlin (Unlicensed)
- Jade Lynn (Unlicensed)
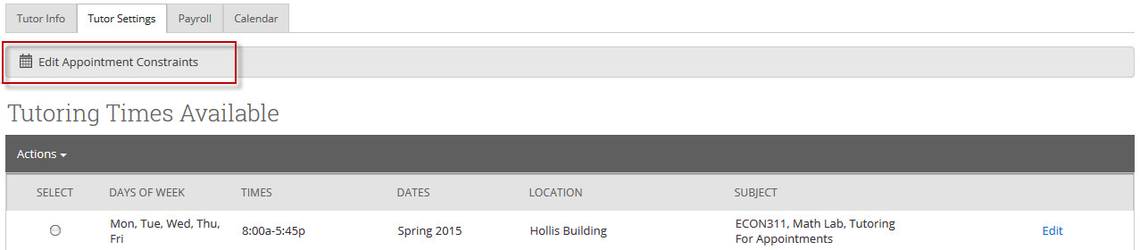
This is where the tutor will define the parameters surrounding their availability to meet with students. GradesFirst gives the tutor full control over the when, where, why, what and even how long each appointment will be. The first step in defining these parameters is by clicking the Edit Appointment Constraints option.
When setting up your appointment constraints, tutors have the ability to define several options. Tutors should keep in mind that these defined options will apply to all tutor appointments created by students (if students are able to create tutor appointments at your institution). Note This will not apply to appointments scheduled by a tutor coordinator, advisor, or other user in the system.
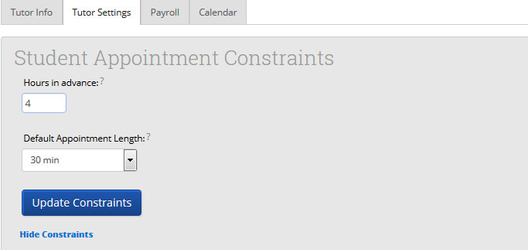
Hours in Advance: This field requires that students schedule appointments with you a certain number of hours in advance (from the current time). For example, if the current times is 1:00pm and you require at least a 4 hour notice, the soonest a student would be able to schedule an appointment would be 5:00pm. To allow students the ability to schedule without an advance notice, leave this field blank or enter a “0”.
Default Appointment Length: This is the default duration for all tutoring appointments created for you outside of the Tutor Center and by a student. If you choose not to set this duration, the appointment time increment at the location, or Group Setting, will be used.
Tutoring Times Available
This is where the tutor defines exactly when, where and for what services (or subjects) they can tutor students. Depending on your tutor permissions, tutors may or may not have the ability to add/edit availability.

To add a new availability, click the Add Time button.

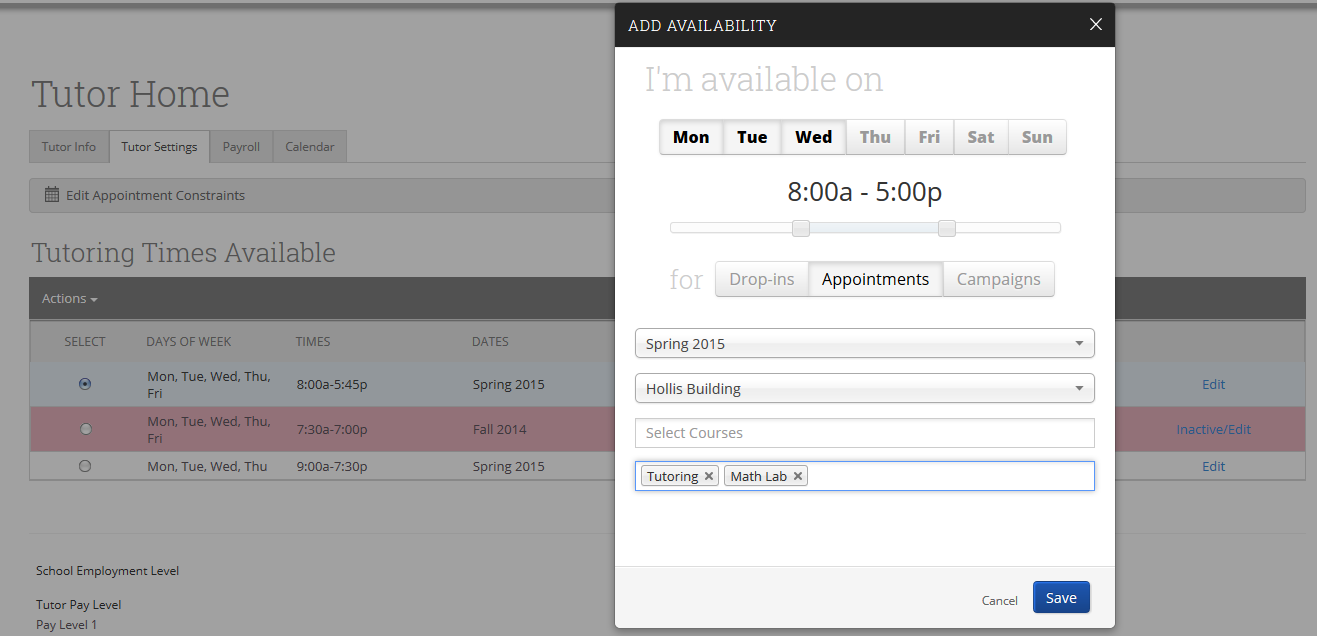
Step 1: Select the days you can meet with students.
Step 2: Define the time frame.
Step 3: Select the type of meeting.
A Drop-in type means a student does not need to sign up for an appointment to meet with a tutor. The student simply shows up at the tutor center and checks-in to meet with the tutor. When Drop-ins is selected, the tutor should also define How Many students they are able to meet with at any one specific time.
An Appointments type means a student must schedule a time in which to meet with you.
Step 4: Select the Duration, or date range, for this availability.
Step 5: Choose the location you will be tutoring.
Step 6: Select the courses for which you can tutor. Note here you can type in the course/ section to search for a particular course.
Step 7: Lastly, select the student services you can tutor and click Save.
Step 8: Repeat these steps to create all of your tutor availability. If you will be tutoring at different locations, each location should have its own availability. Note a Copy Time button is available allowing you to make a copy of any availability that has already been created that you would like to add and make edits to.