/
Customizing Progress Report Campaigns and Emails
Customizing Progress Report Campaigns and Emails
- Jade Lynn (Unlicensed)
Owned by Jade Lynn (Unlicensed)
Last updated: Nov 06, 2014
Did you know that your Client Success Manager can help you customize your progress report requests and at-risk emails? Read on to learn more about the optional customization!
Progress Report Claim Page
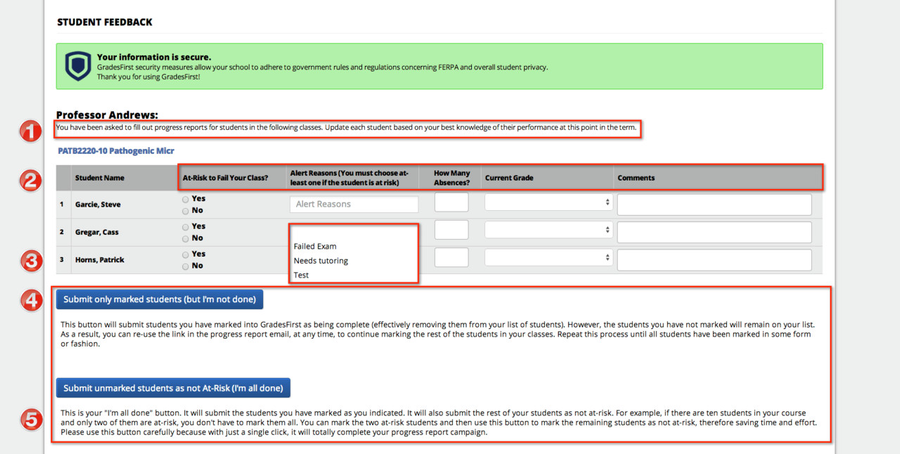
- Professor Instructions: These instructions will read by default: "You have been asked to fill out progress reports for students in the following classes: Update each student based on your best knowledge of their performance at this point in the term." Your GradesFirst CSM can update these instructions to your preferred wording. This could be changed to clarify the type of information that you are looking for or to describe the campaign structure to faculty. There is not a character limit on this space.
- Columns and Column Headers: Your GradesFirst CSM can remove columns for you or change the name of the column headers.
- Alert Reasons: The alert reasons are added by the GradesFirst Administrator. You can learn more about adding, editing, and deleting alert reasons by visiting our Case Management Administration guide.
- Submit Button Language: Your GradesFirst CSM can change the language used on the submit buttons.
- Submit Button Instructions: Your GradesFirst CSM can also update the instructions for submitting information.
Student Alert Email
At-risk emails can be sent automatically to students when they have been marked at-risk in one of their courses. The at-risk email setting can be enabled under School Settings.
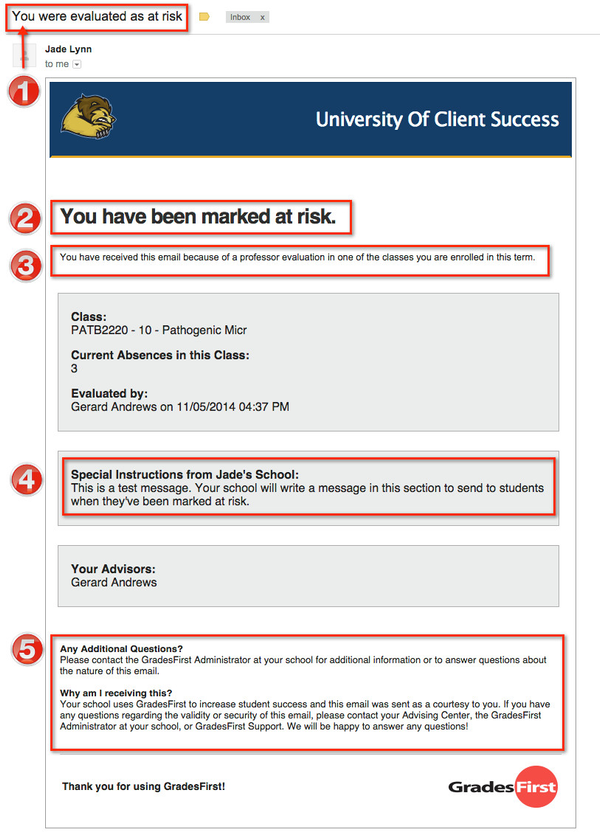
- At-Risk Email Subject: Your GradesFirst CSM can edit the email subject.
- At-Risk Email Header: Your GradesFirst CSM can edit the header of the email.
- At-Risk Email Body: Your GradesFirst CSM can edit the body of the email. The body will default to "You have received this email because of a professor evaluation in one of the classes you are enrolled in this term".
- GradesFirst Email Footer: The GradesFirst administrator can update the email footer. This footer will go out with every email that comes from GradesFirst. To update the footer, simply navigate to the admin tab > school settings.
, multiple selections available,
Related content
Faculty Guide to Progress Report Campaigns
Faculty Guide to Progress Report Campaigns
More like this
Faculty Progress Reports
Faculty Progress Reports
More like this
Absence E-mail Templates
Absence E-mail Templates
More like this
Email Capture
Email Capture
More like this
Release Notes: December 5, 2015
Release Notes: December 5, 2015
More like this
Release Notes: February 20, 2016
Release Notes: February 20, 2016
More like this