Student Profile
- Daniel Rehner
- Joy McLaughlin (Unlicensed)
- Jade Lynn (Unlicensed)
Viewing a Student’s Profile
To view a students profile, simply click the students name via the link anywhere in GradesFirst.

To open the student profile in a seperate tab in your browser, hold your control key (Ctrl) down on your keyboard and click on the name of the student with your mouse.
 (example of the tab that will open)
Now, let's look at a students profile and what options are available.

Classes This Term
This grid displays the student's schedule for the current term. Alongside each course name will be a professor's name. You can click on the professor's name to view their profile. You will also see the days and times each class meets, along with any mid-term or final grades assigned. It's important to note that the mid-term and final grades come from your Student Information System not from a professor's grade submission. You will also notice the Absence column and its value. Clicking on the number of absences for a course will give you the specifics about each absence.
The last column of the Classes This Term grid will allow the advisor several actions per course. The options available to you are dependent on the permissions applied to you.
Course Assignments
Depending on your advisor permissions, you may be able to click on the Course Assignments link to view all of the assignments that have been created (most likely by the professor) for that course. Again, depending on your permissions, you may be able to create new assignments.
Request Tutor Appt
If you see this option, you can request for a tutor to schedule a tutor appointment with the student for that specific course. For example, when I click on the Request Tutor Appt link, the system displays the Send Tutor Request dialog.
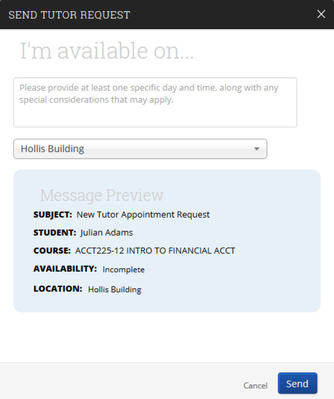
The first field in this dialog is a comment box where I should enter information about when the student is able to meet with a tutor. Be as specific as possible when commenting on when the student would like to meet with the tutor. This information will make it easier to match the request with a tutor. Next, select a preferred location for this request. When all the information has been entered, you can preview the request before sending. Click Send when done. The system will then send an email notification to the Tutor Coordinator for that location.
Schedule Tutor Appointment
Rather than simply request a tutor appointment, if you have this permission, you can bypass requesting and actually create a tutor appointment. When you click this link, the system will display the Schedule an Appointment page so that you can create a tutor appointment for your student.
Actions menu
In the dark area of the Classes This Term grid, you will notice an Actions arrow that will allow you to open a new menu and includes some additional action items for your convenience.
Send Message to Professor
You can check the box beside one or more professors and click the Send Message to Professor button to quickly communicate with the student’s professors.
Create a New Progress Report
A progress report is a way a professor can indicate how a specific student is doing in their class. “This student is at-risk to fail my course” or “Bryan is doing great in my class” are examples of things you might see on a professor’s progress report. Most often, professors will be the ones creating progress reports for students, though sometimes advisors will as well. To create a progress report, check the box next to the course and from the Actions menu click the Create a New Progress Report button.
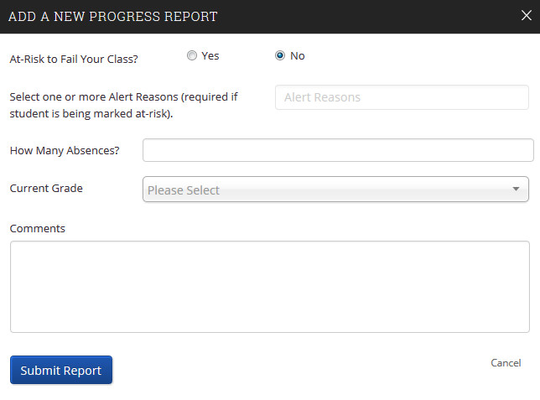
The first field is At-Risk to Fail Your Class? If you answer “Yes”, then you must select an Alert Reason that has been previously created by your GradesFirst Administrator. Next you may enter How Many Absences? this student has accrued in this course. If you do not know, you may leave this field empty. Select the student’s Current Grade, if known. Again, if you are unsure, you may leave this field empty as well. Lastly, you may enter a Comment about the student and click the Submit Report button. This progress report is now attached to the student and can be view at any time by clicking on the Report/Notes tab on the student profile page.
Drop Class
Classes will Add and Drop automatically as GradesFirst syncs to your institution’s student information system. However you may still need to drop a class manually. To do so, check the box beside the course’s name and from the Actions menu click the Drop Class button. The course will then appear in the Dropped Section of the student’s Classes this Term grid. You can easily Undrop the course and it will return to active status.
Appointments
The Appointments tab displays all the student’s Upcoming, Recent, and even No Show appointments.
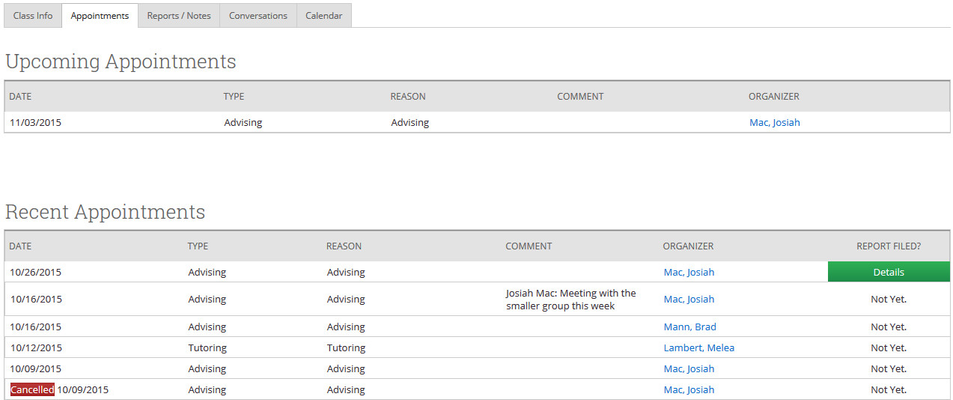

This is a great source of information when you want to quickly see all of a student’s appointments and whether or not they attended.
Reports/Notes
Perhaps one of the most informational tabs on the student’s profile is the Reports/Notes tab. It contains information on Cases, Alerts, Progress Reports, Advisor and Tutor Appointments and Notes about a student.
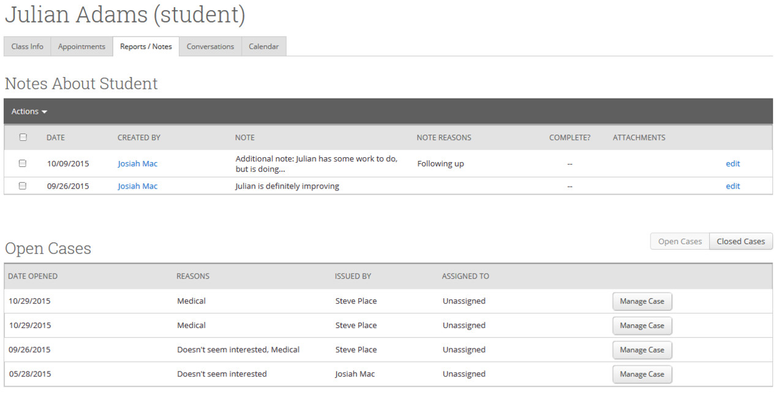
- Notes About Student. All Notes that have been created for a student will be listed here. Advisors will be able to click the Edit link to make necessary changes to any note. From the Actions menu you may also add a note, mark as complete or delete.
- Open Cases. When a student is marked at-risk, a Case (or “case file”) can be opened in order to follow up with that at-risk student. A case lets advisors record what actions transpired to help the at-risk student. This grid will display all cases that have been opened for that student and the Manage Case button will let the advisor add an activity to the case.
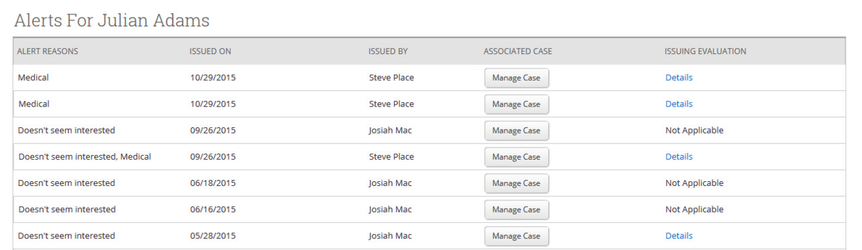
- Alerts. Alerts and Cases go hand-in-hand. When a student is mark as at-risk, an alert reason must be selected. Each alert that a student receives will be listed in this grid.
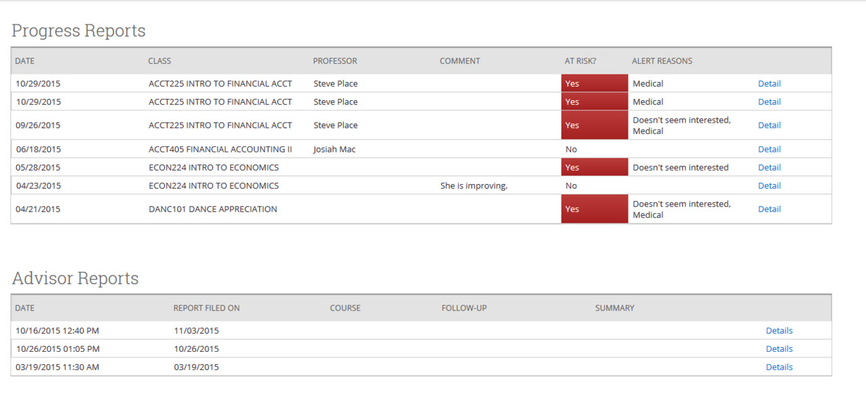
- Progress Reports. This grid will display all progress reports that have been created for that student. The advisor can use the Detail link to see more information about any report.
- Advisor Reports. The Advisor Reports grid will list all of the advisor reports that have been filed for that student. An advisor report can be filed after an advising appointment and even when there isn’t an appointment at all. Click the Details link to see more information about the report.
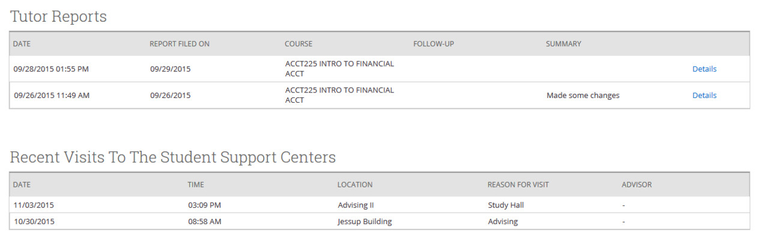
- Tutor Reports. Just like the Advisor Reports grid, this grid lists all the tutor reports that have been filed for that student. Tutor reports are filled out by tutors after a tutor appointment. Click the Details link to see more information about the report.
- Recent Visits To The Student Support Centers. This grid will show any recent visits that the student has made to center e.g. Study Hall
Student Status
Also on the student profile page we display a student’s at-risk and study hall status.

- Status. A student’s status can either be Normal or At-Risk. All students default to the Normal status.
- Study Hall Status. This is a real-time indicator that lets the advisor know if the student is currently checked into study hall.